Just some days ago, I attended at the WordPress Meetup in Nairobi. The topic was „about web hosting for WordPress sites“. Emmanuel Chekumbe, who is a coder and web designer in Nairobi, Kenya at nabaleka.com, asked me to attend the discussion, since I host my sites on my own servers and also offer web hosting packages and server setup services.
The meetup has shown me some insights in regards of hosting, in regards of the questions users may have and of course the demand. So during the meetup I have seen some interested faces and I felt that the spirit „I need to try that myself“ was attending as well. Therefore, I am writing this tutoral, for all of you guys and girls out there who want to have a own web server.
As mentioned at the meetup, I have a tutorial that allows one to fire up his own Web & Mail Server. And today I want to post a full tutorial for those ones who need a plain Web Server, where they can host their own web sites. All this, on a server that costs only $5 / Month. And the very much cool part of it is, you will get 10$ in credit for Digital Ocean, when you use this Digital Ocean LINK to sign up with Digital Ocean. To get the credit, you simply have to add, either a Payment Method (Visa / MasterCard / American Express / Discover) or top up your account via PayPal. With the intention to only run this $5 Web Server, you will get the Digital Ocean Server actually two months for free. Which is amazing and allows you to play around a bit, before you spend real money on it.
Anyway. First of all, I would like to apologize upfront in case my English is not that perfect. Let me know if you find some typos. In some rare screen-shots, you will find the UI with German language, please don‘t be afraid, I will explain things ;).
This tutorial is very beginner friendly. The only thing you need to be able to, is to use your keyboard and your mouse, download, install and run programs on Windows. The rest should be covered by this tutorial. My goal is, to deliver a how to, that allows „Mama Mboga“ from the shop around the corner, to get her own WordPress blog running on her own web server. I hope I will get there. I also want to make sure, that her Blog and server is protected against brute-force attacks (User-name / Password guessing attacks) and is performing very well. So, let me start.
Mama Mboga you need a Domain Name,
what is the name of your shop? „I don‘t know my friend … just make it something with mama mboga“. Perfect. So let me show you, how you register a domain name at Namecheap (The registration process is similar at other providers). Mama Mboga, just open the site www.namecheap.com and enter the name you would like to use for your WordPress Blog and click the search button.
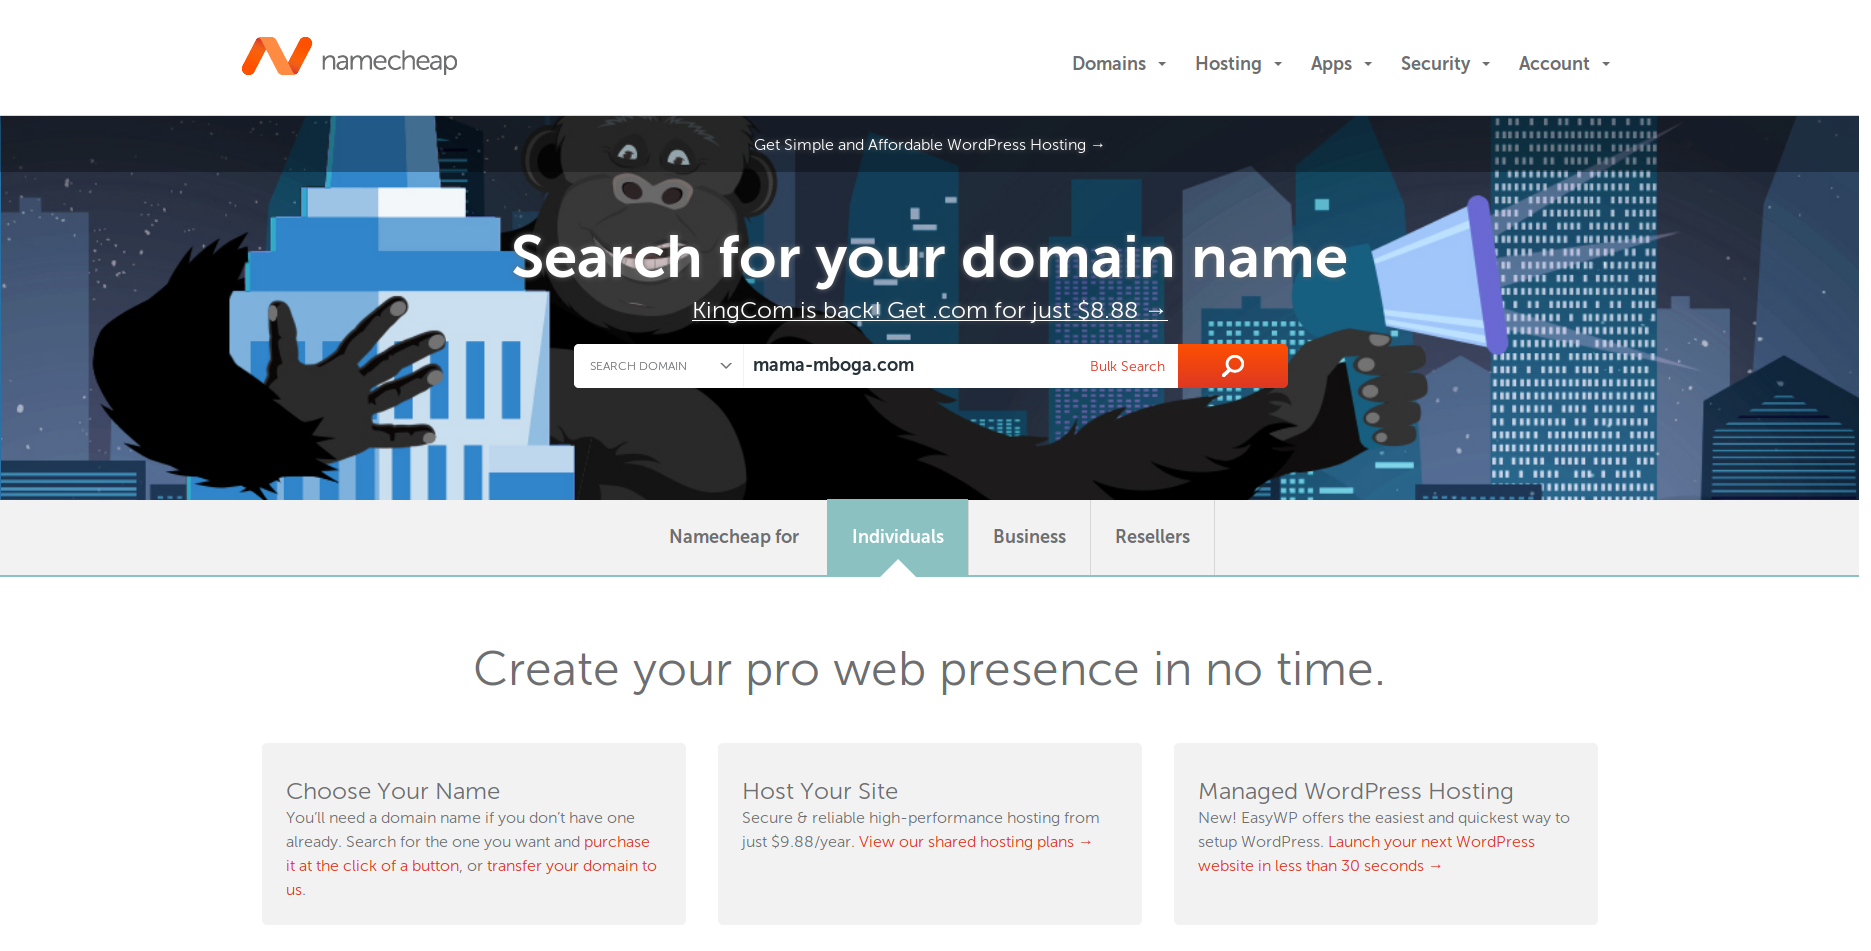
Bingo! mama-mboga.com is still available (was available), are you happy with it? „Yes my friend, this sounds good.“ Wonderful. Now you just need to click on the Add to Cart button.
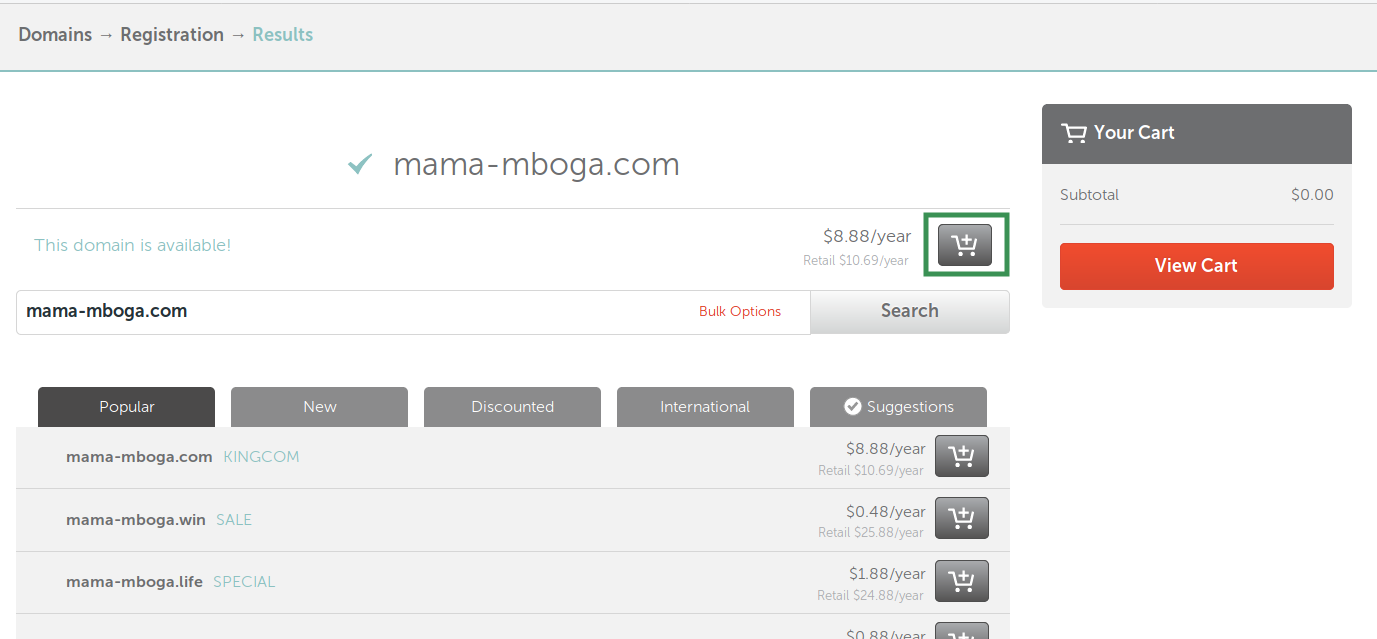
The domain will cost you 9,06$ for one year. You have to click on „View Cart“ to continue.
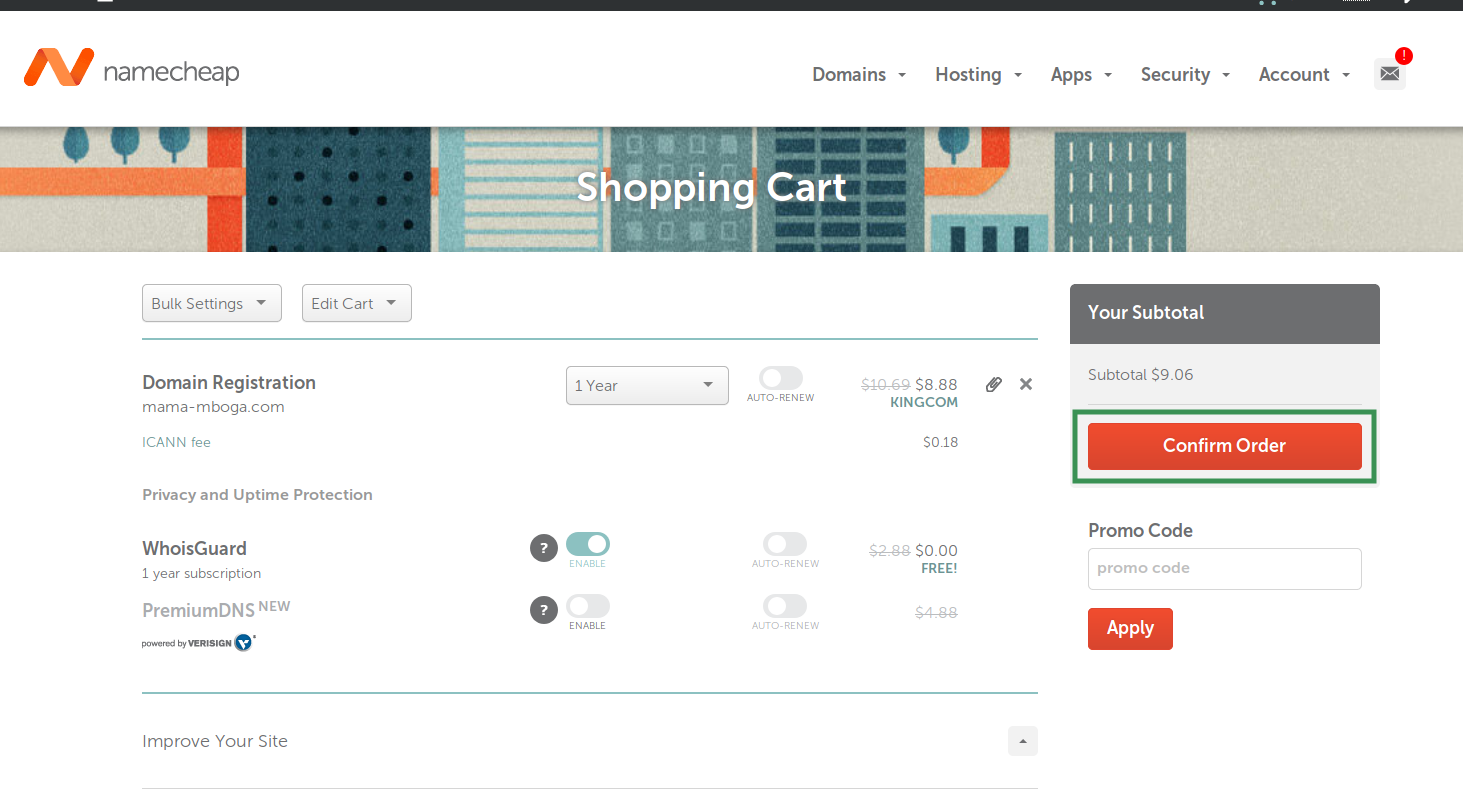
Now, in Namecheap, you click on „Confirm Order“ to continue in the process. This is just the domain Registration. So no additional packages or costs will be added during the process. Now, after clicking on „Confirm Order“, you will need to register an account with Namecheap. They will need your personal details to register the domain
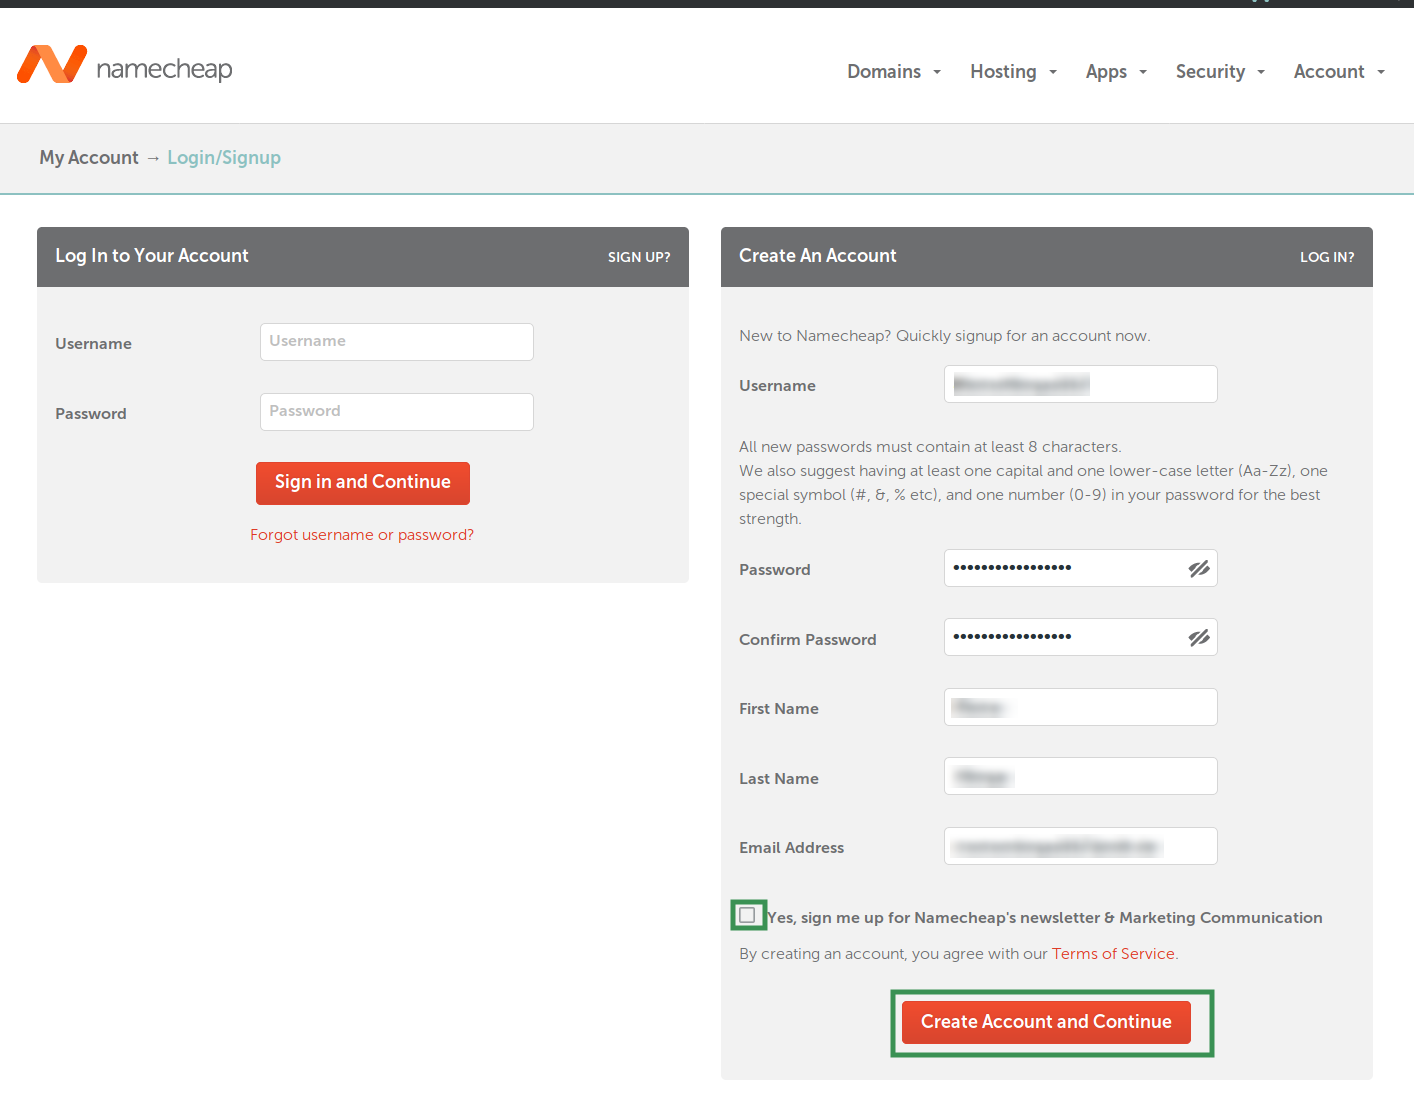
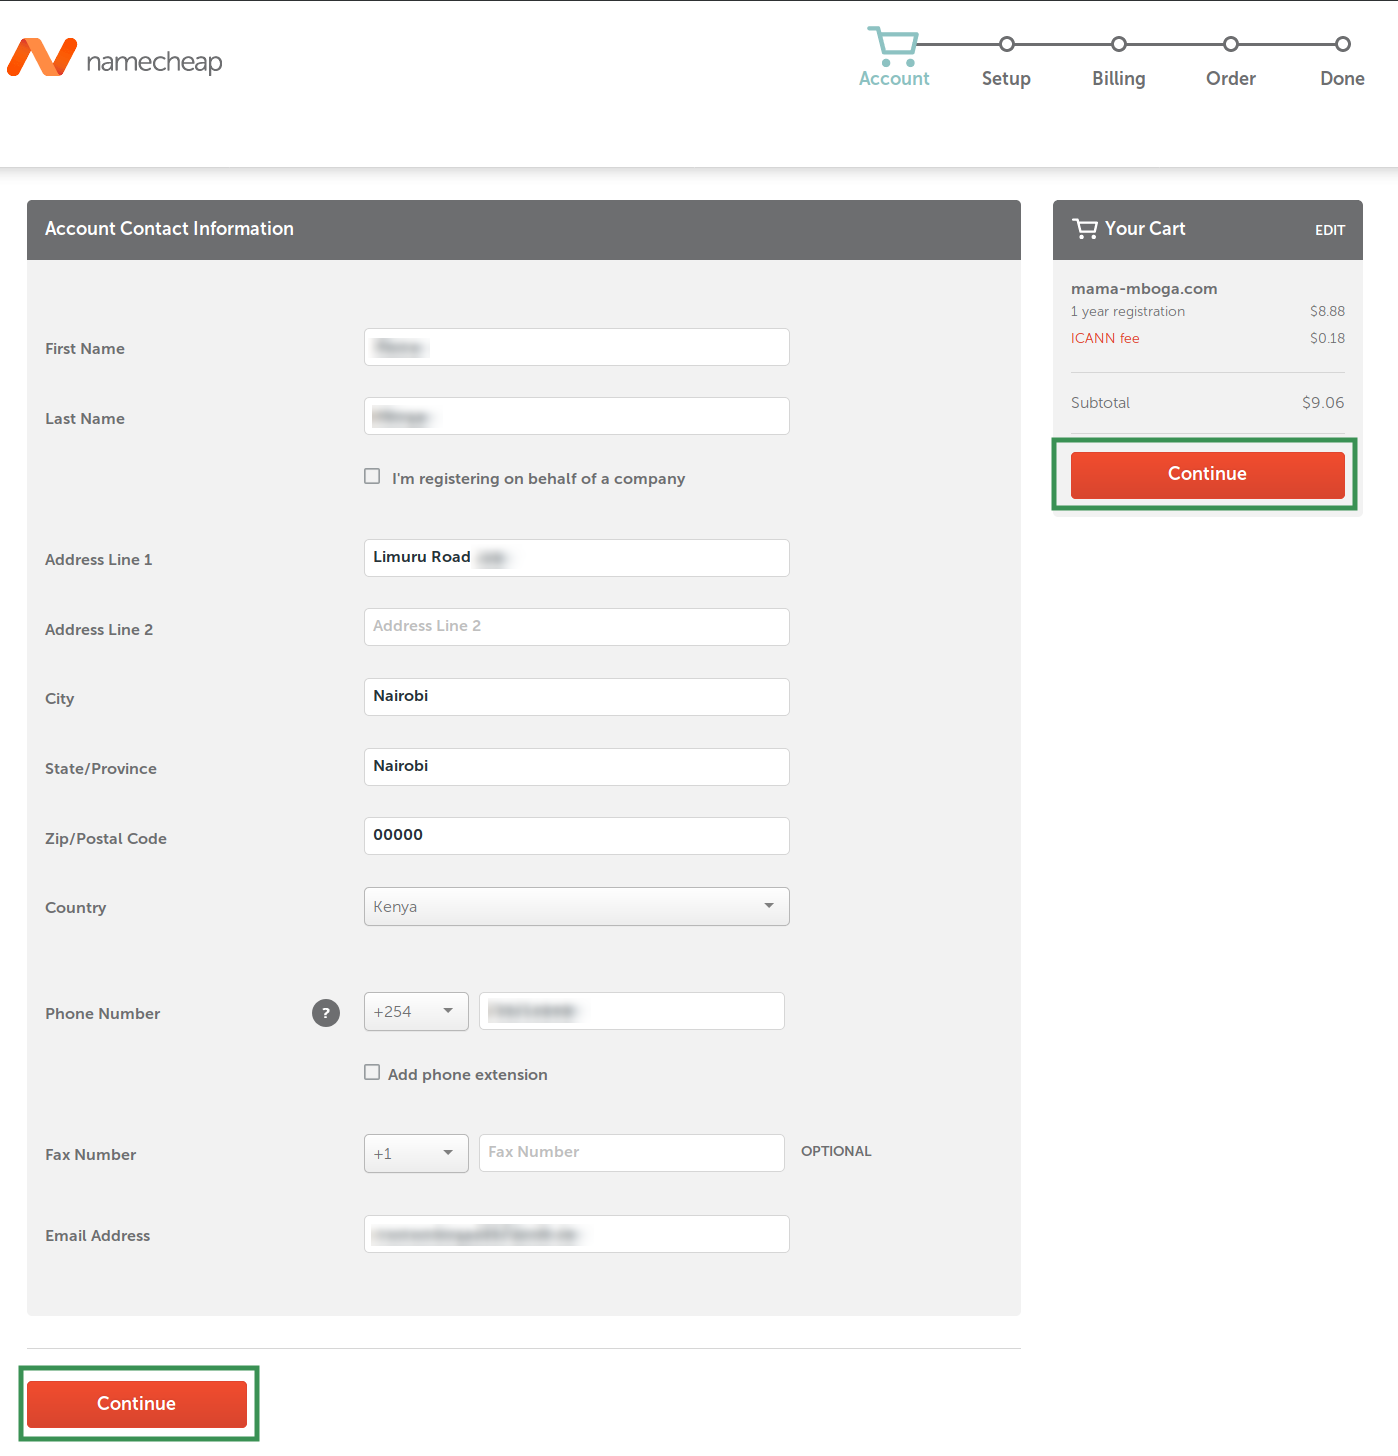
You need to enter a user-name, a password, confirm the password, your first name, your last name, and a email address. When everything looks fine to you, you can uncheck the box that says „Yes sign me up for Namecheap‘s newsletter……“ and click on „Create Account and Continue“ On the next page, you can uncheck „I‘m registering on behalf of a company“ and enter your address and a phone number. These details are required to register a domain name, so you will have to enter them. But don‘t worry, they will not send you marketing SMS. When all fields are filled out, you can click „Continue“.
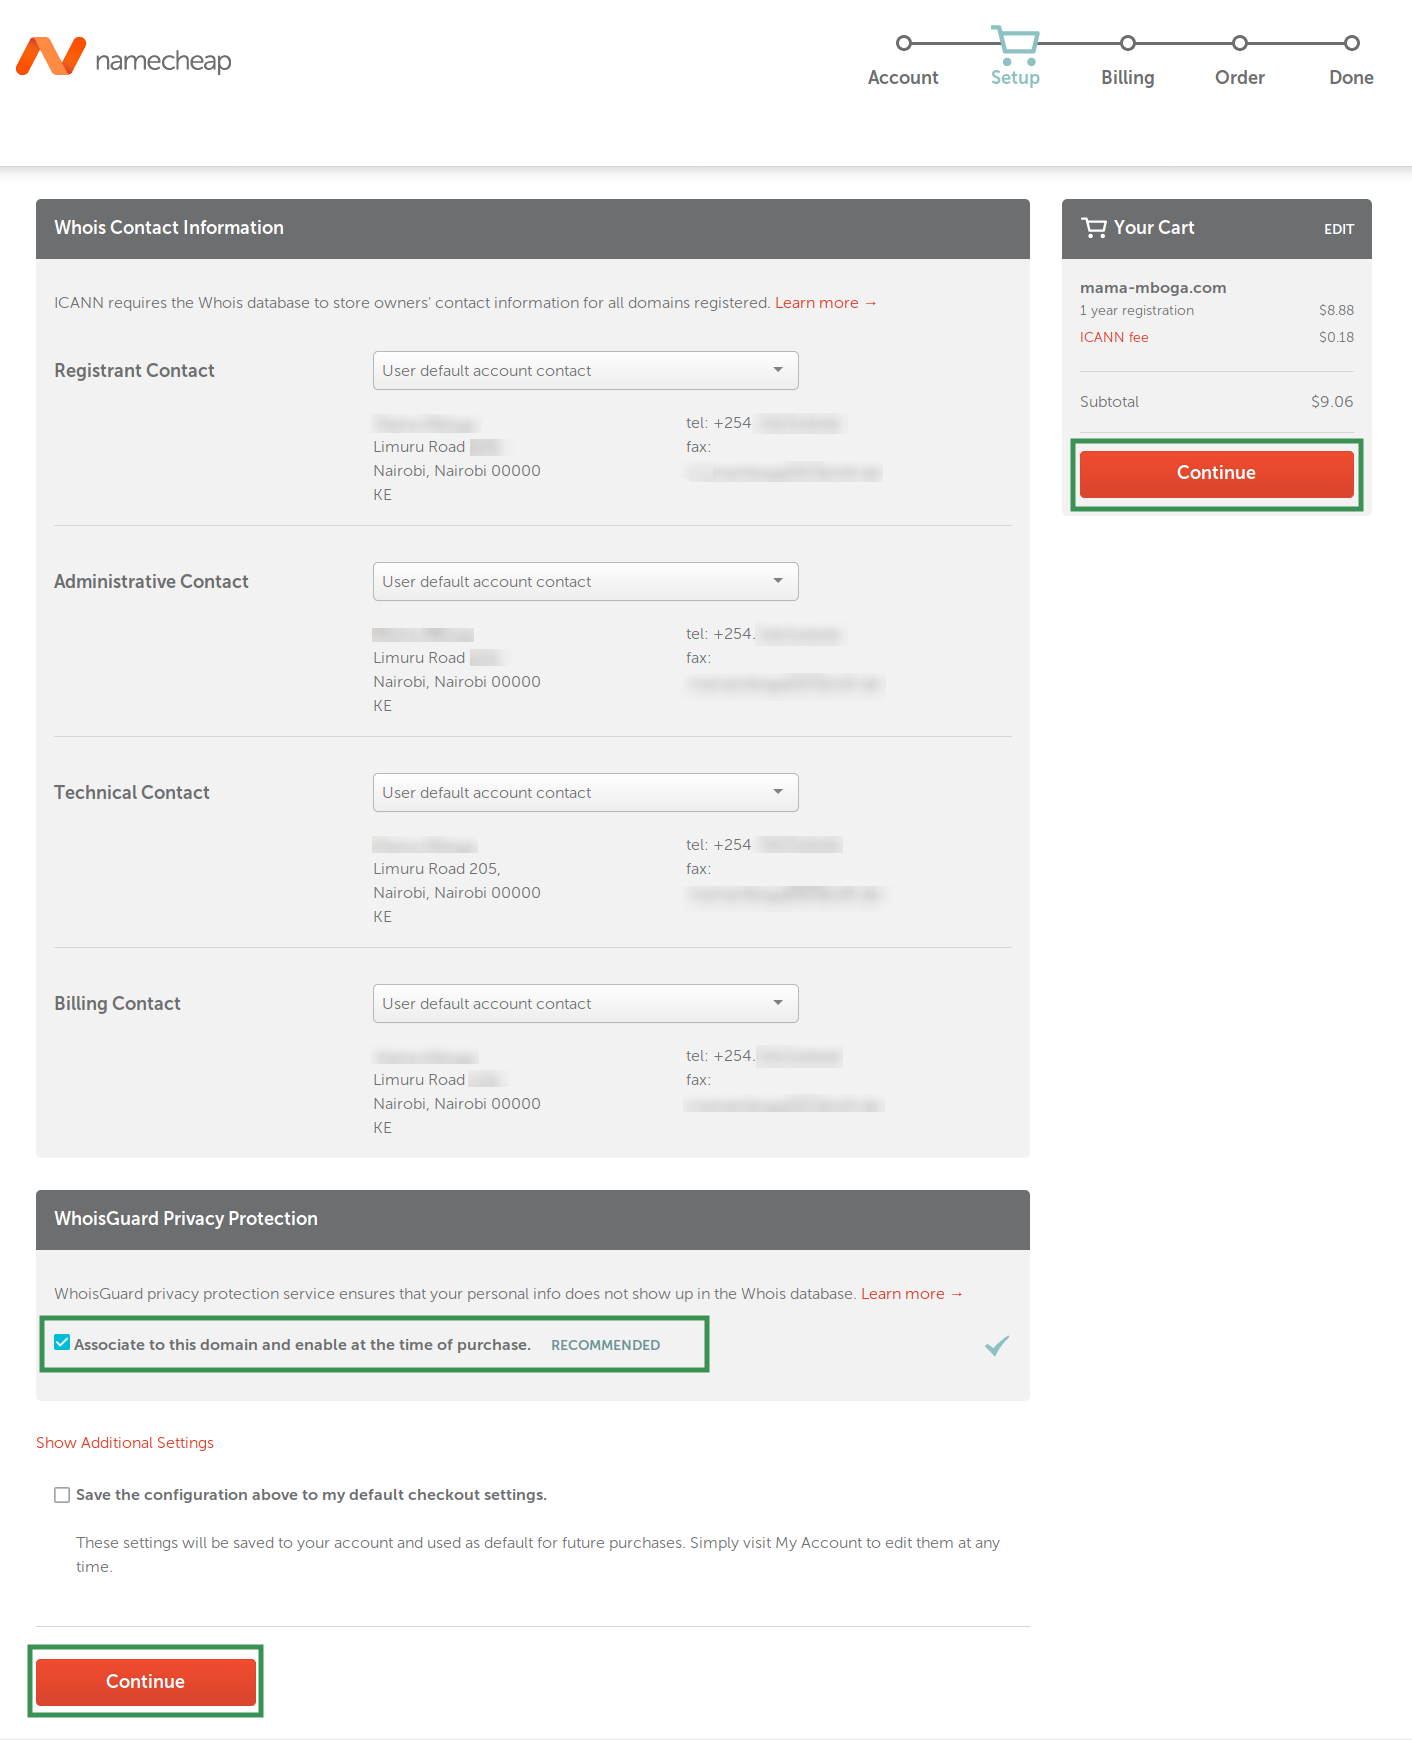
Now you will see an overview of the details being used to register the domain. Make sure, the box in WhoisGuard Privacy Protection is checked. That will secure your private data. When everything is fine, we can continue with a click on „Continue“.
Now comes the payment process. You have to enter your credit card details in order to finish the payment. You can also use your PayPal Account. In this example I will use my PayPal account to finish the purchase. So I click on PayPal to select it. Then the page reloads, and shows me a button „Check out with PayPal“. That‘s what I want.

After clicking the PayPal checkout button, I will be directed to PayPal and have to login to my PayPal Account.
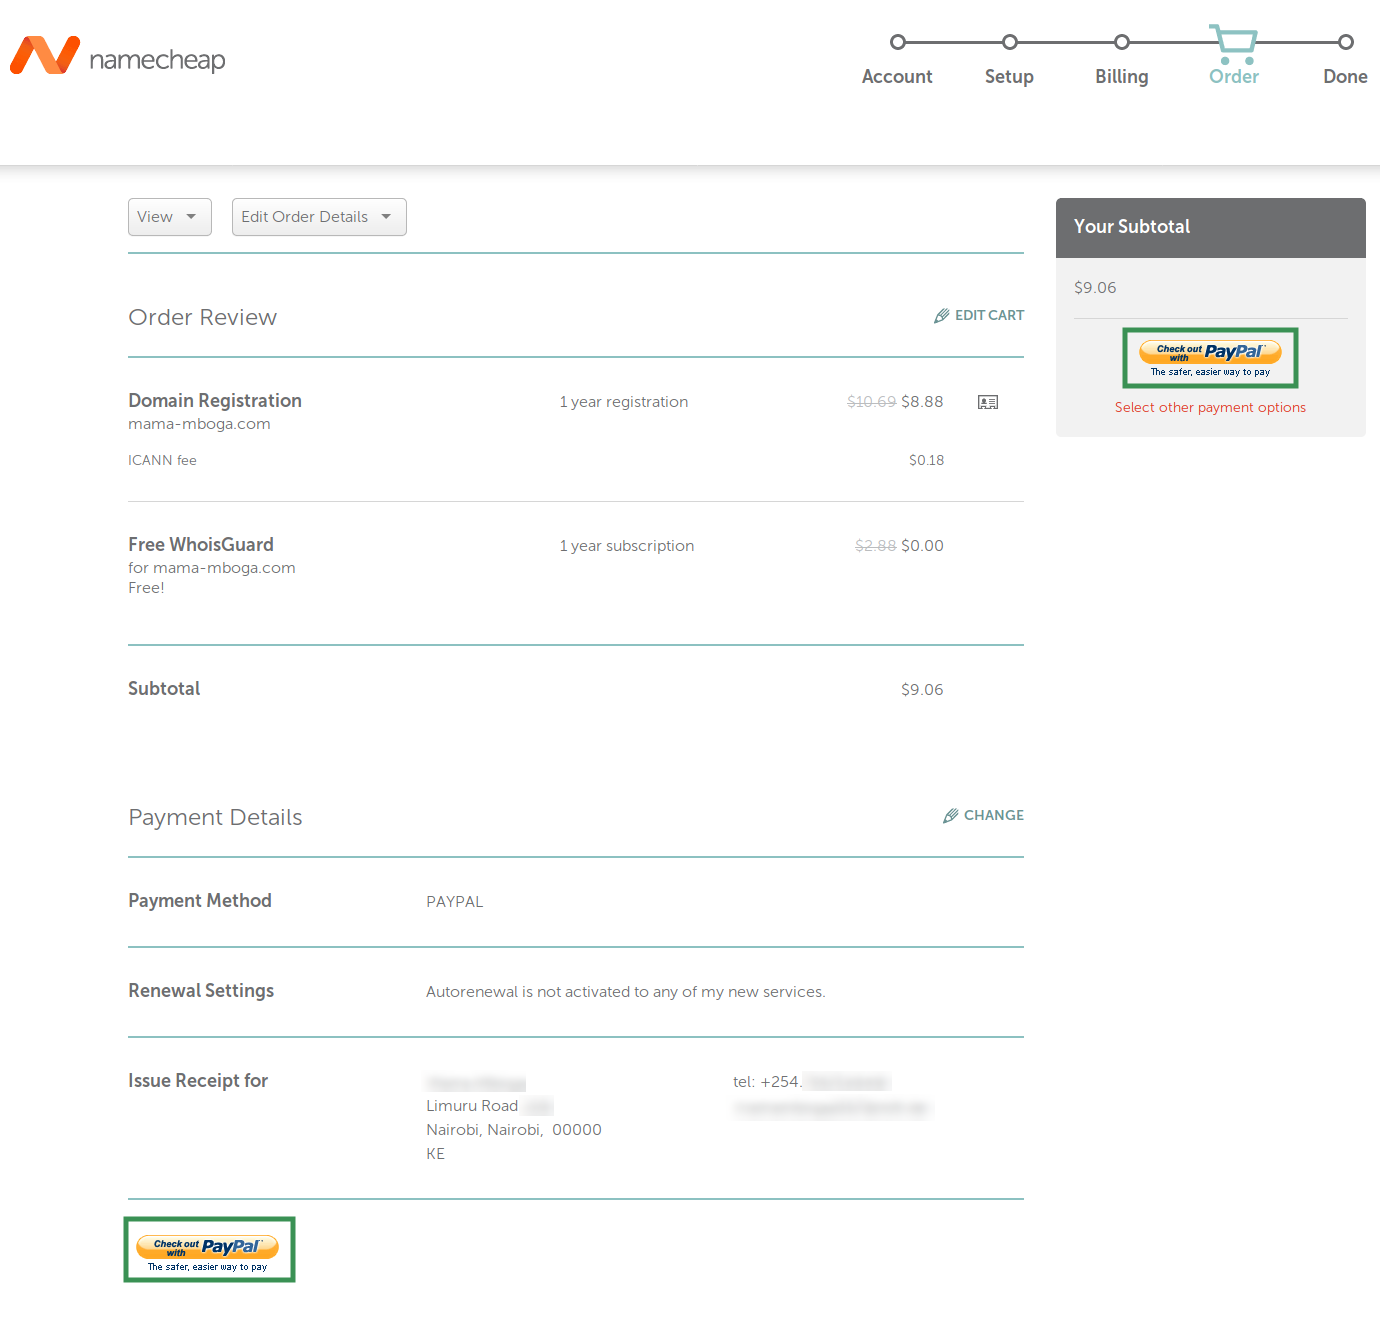
Then I need to confirm the payment, and when all this is finished, I will be send back to Namecheap and the payment will be finalized.
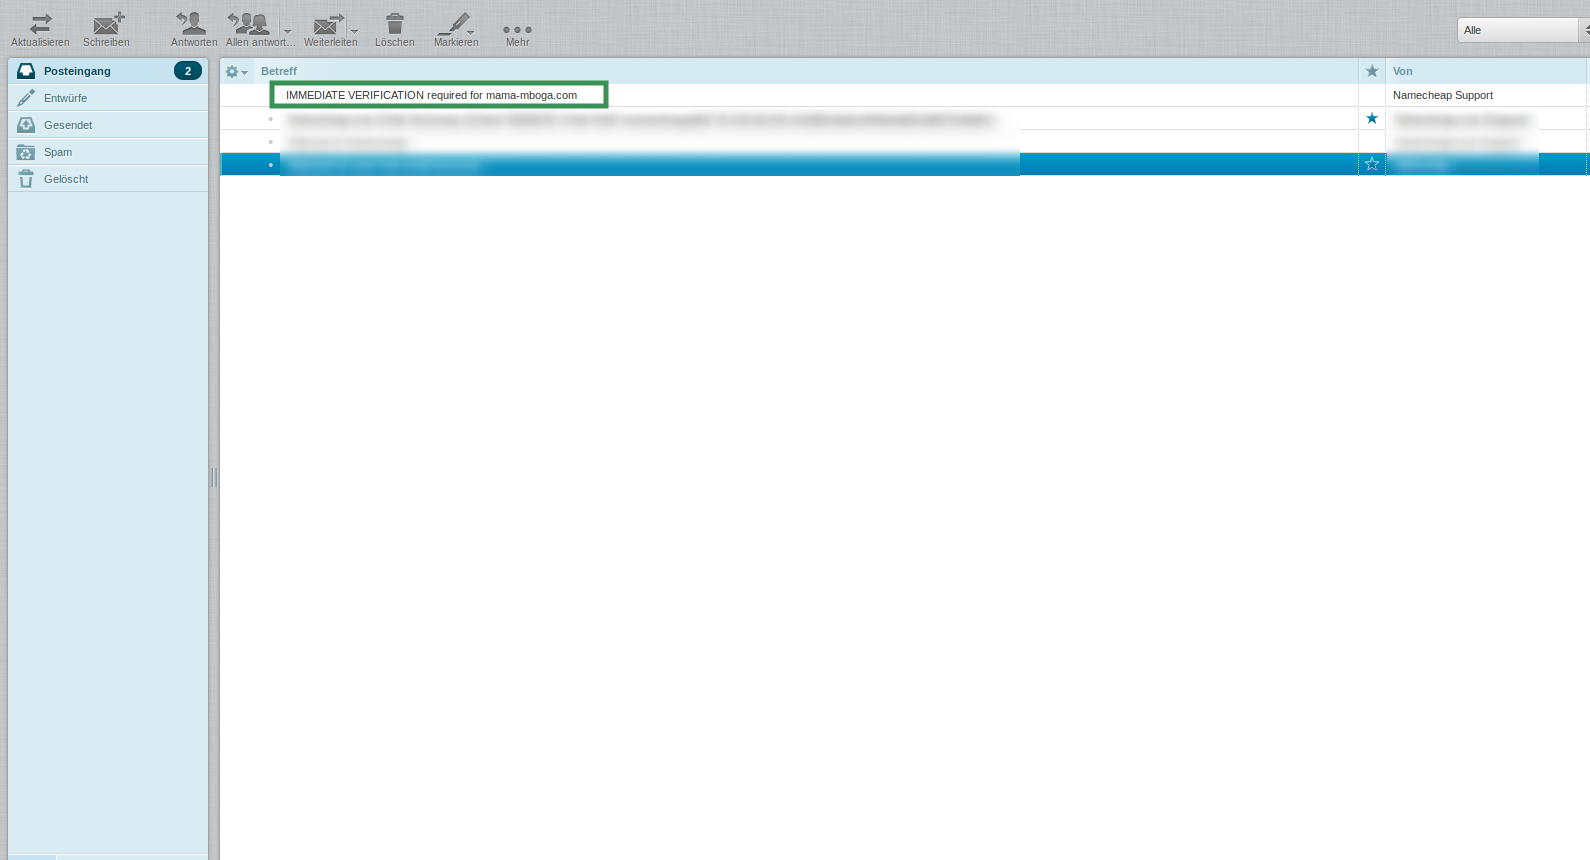
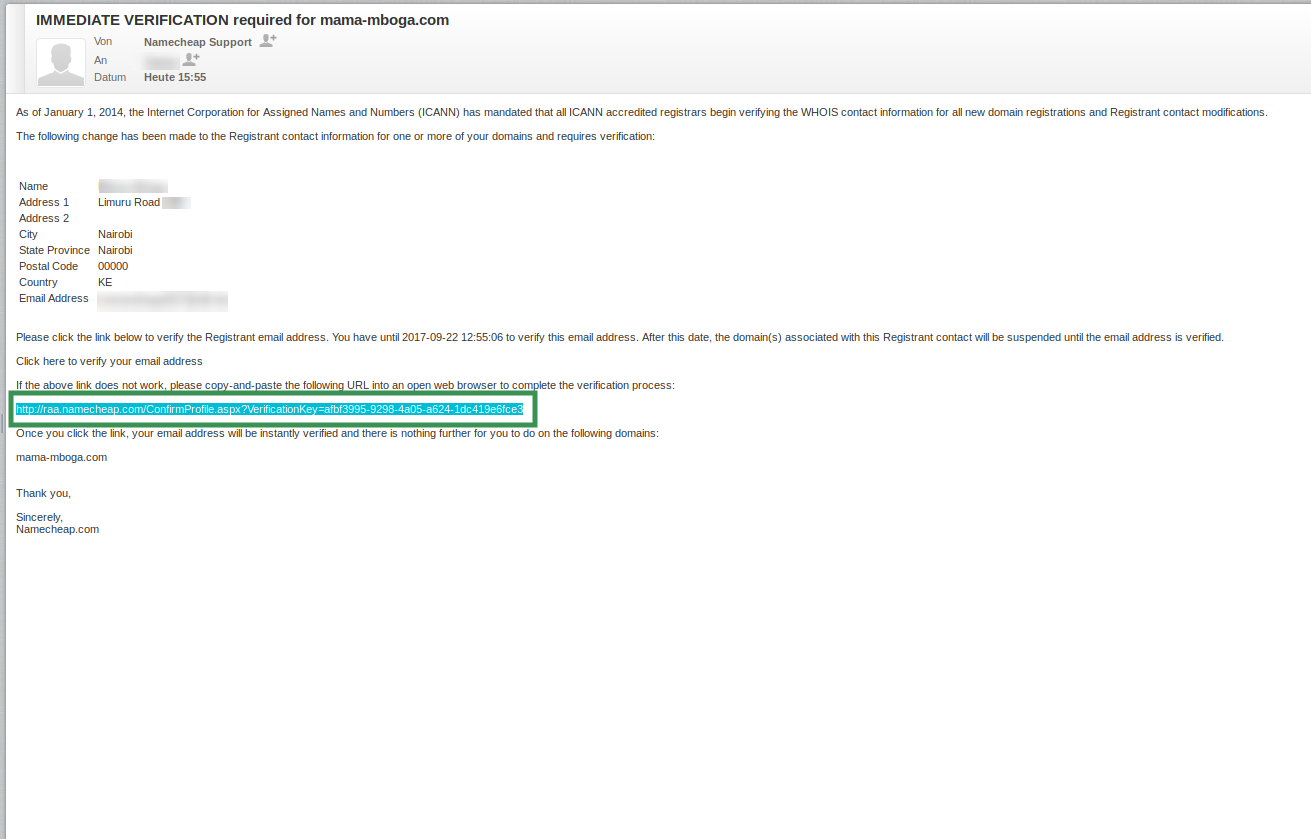
Next you will may see a box „Thank You for Your Order!“ you can close that box with a click on the X. Next you have to take a look into your E-Mail Account. Lookout for a E-Mail that says: „IMMEDIATE VERIFICATION required for mama-mboga.com“.
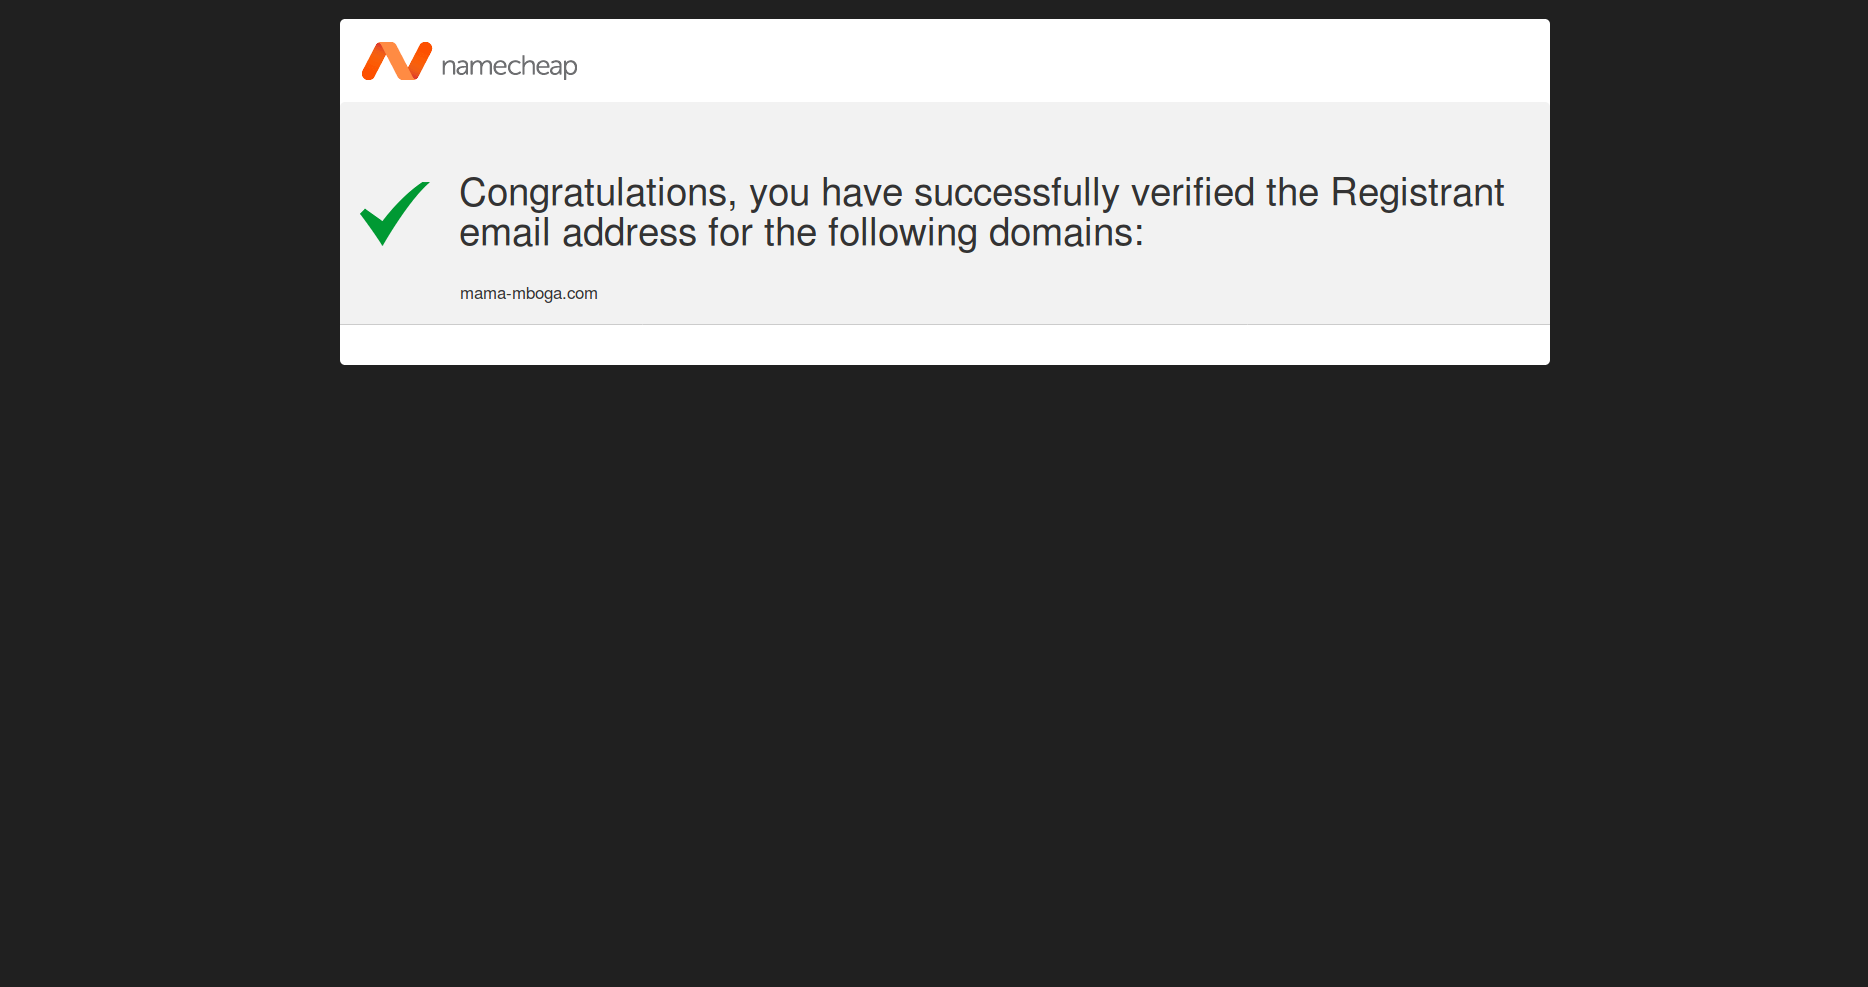
Open that email. You should find either a link in it, or a URL like: http://raa.namecheap.com/ConfirmProfile.aspx?VerificationKey=xxxxx-xxxxx-xxxxx-xxxxx-xxx click that link, or open the URL in your browser to confirm the ownership of your newly registered domain name.
Now you want to go back to Namecheap. You should see a purchase summary. Next to Domain Registration, click on „MANAGE“. In the Domain List in your account, click again on Manage next to your domain name. Look for the section: „NAMESERVERS“ and click next to it on „Namecheap BasicDNS“, and choose „Custom DNS“ and then enter these name servers:
ns1.digitalocean.com
ns2.digitalocean.com
ns3.digitalocean.com
click the check-mark on the right to confirm and save your changes. Perfect. Now you own your domain name, and you have pointed them to Digital Ocean Name-servers.
You deserve a cookie.
Signing up with Digital Ocean
Digital Ocean is a SSD only VPS ( Virtual Private Server ) provider which allows you to fire up a server in less than 60 seconds and the smallest server they offer goes at 5$ per month with 20GB SSD storage, 512 MB in RAM and one Intel Hexcore CPU with 1.8 – 2.4 GHz computing power. This specs are more than enough to host a WordPress blog on it. I‘d say, you can even run about 3 – 4 WordPress blogs on it without noticeable hiccups. Of course you have to consider the amount of visitors you get. The more visitors you have on a site, the more power the server will need. But the beauty of a Digital Ocean Server is, that you can expand the capacity of your serve with a few clicks, on demand. Start low and get large as you grow.
To get 10$ in credit, which will allow you to run the smallest of their servers for two months, you‘d need to sign up using this link: https://m.do.co/c/563e4d529d3bn, the $10 will be credited, after you, either add a valid payment method (Visa / MasterCard / etc.) or top up your Digital Ocean account with $5 using PayPal.
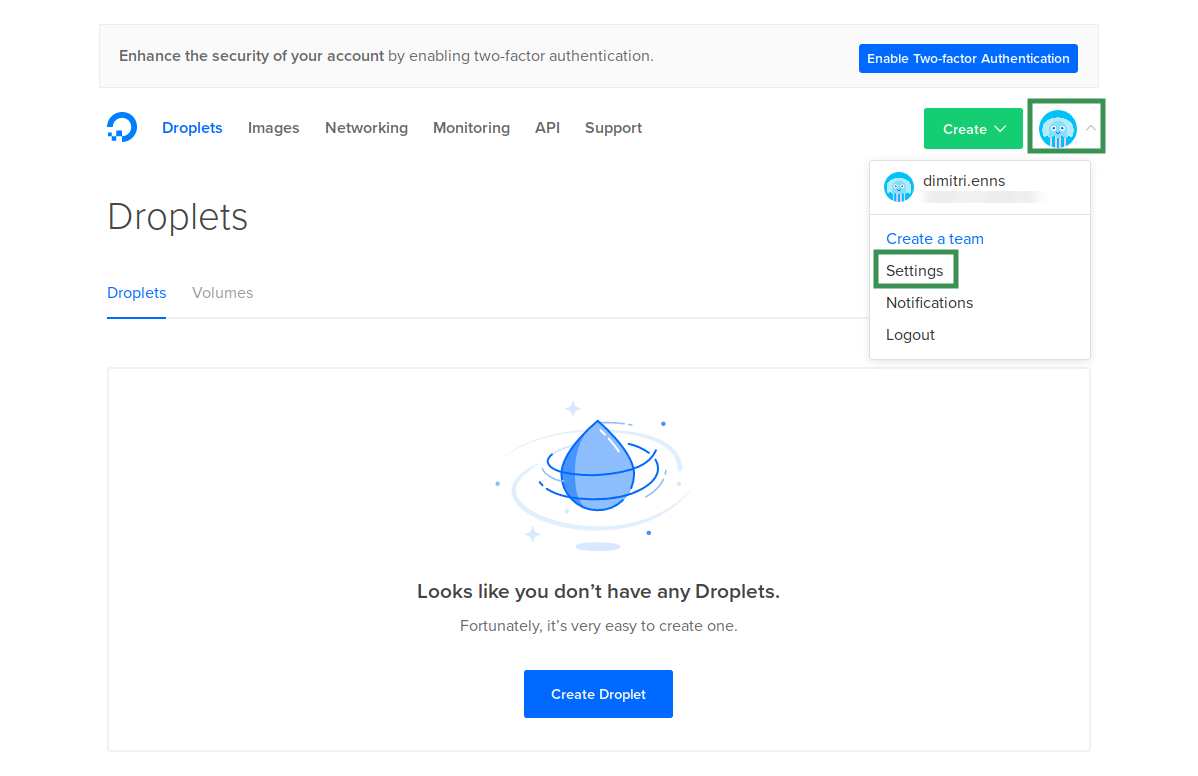
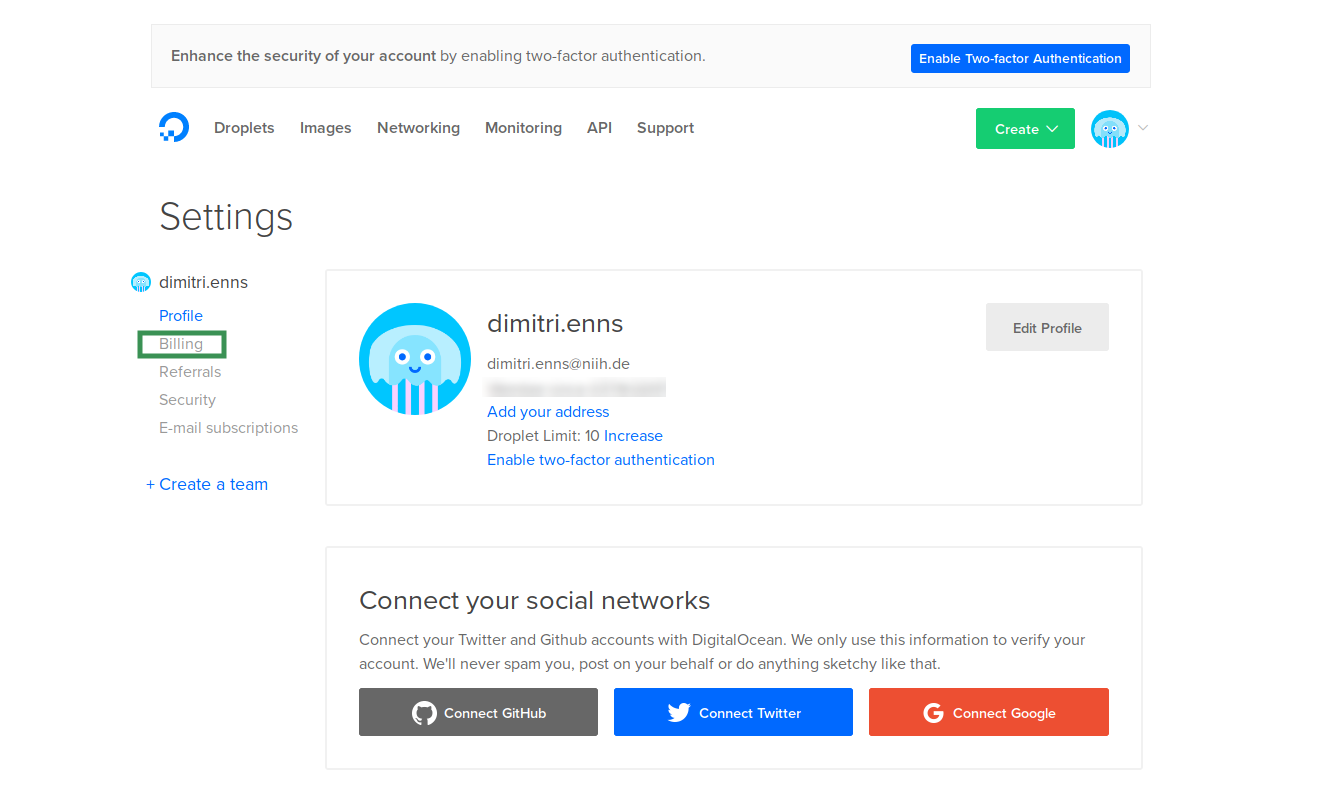
To Sign Up with Digital Ocean, you need to enter your Email Address and a password only. The next step is to check your Inbox for a mail asking you to click a link to confirm the ownership of the Email address. Then you click round icon on the top right hand corner, click on settings, click on billing, and add your payment method or top up via PayPal, to receive the $10 credit.
Quick – and IMPORTANT – Note
I will be using the Domain ispconfig-server.space for this Tutorial. So, where ever I use the domain ispconfig-server.space or any of it‘s sub-domains, please make sure you replace it with your domain or sub-domain too. The same is for your-domain.tld. When ever I use that, you should replace it with the domain you have registered.
Creating a $5 server at Digital Ocean
To create the server, you will just have to click on „Droplets“ on top of the page, and then click the „Create Droplet“ button. Then you want to choose Ubuntu 16.04.3 x64 as the server OS, choose the $5/month size, choose „London“ as data center region, in additional options enable Monitoring, and as hostname enter: host.your-domain.tld.
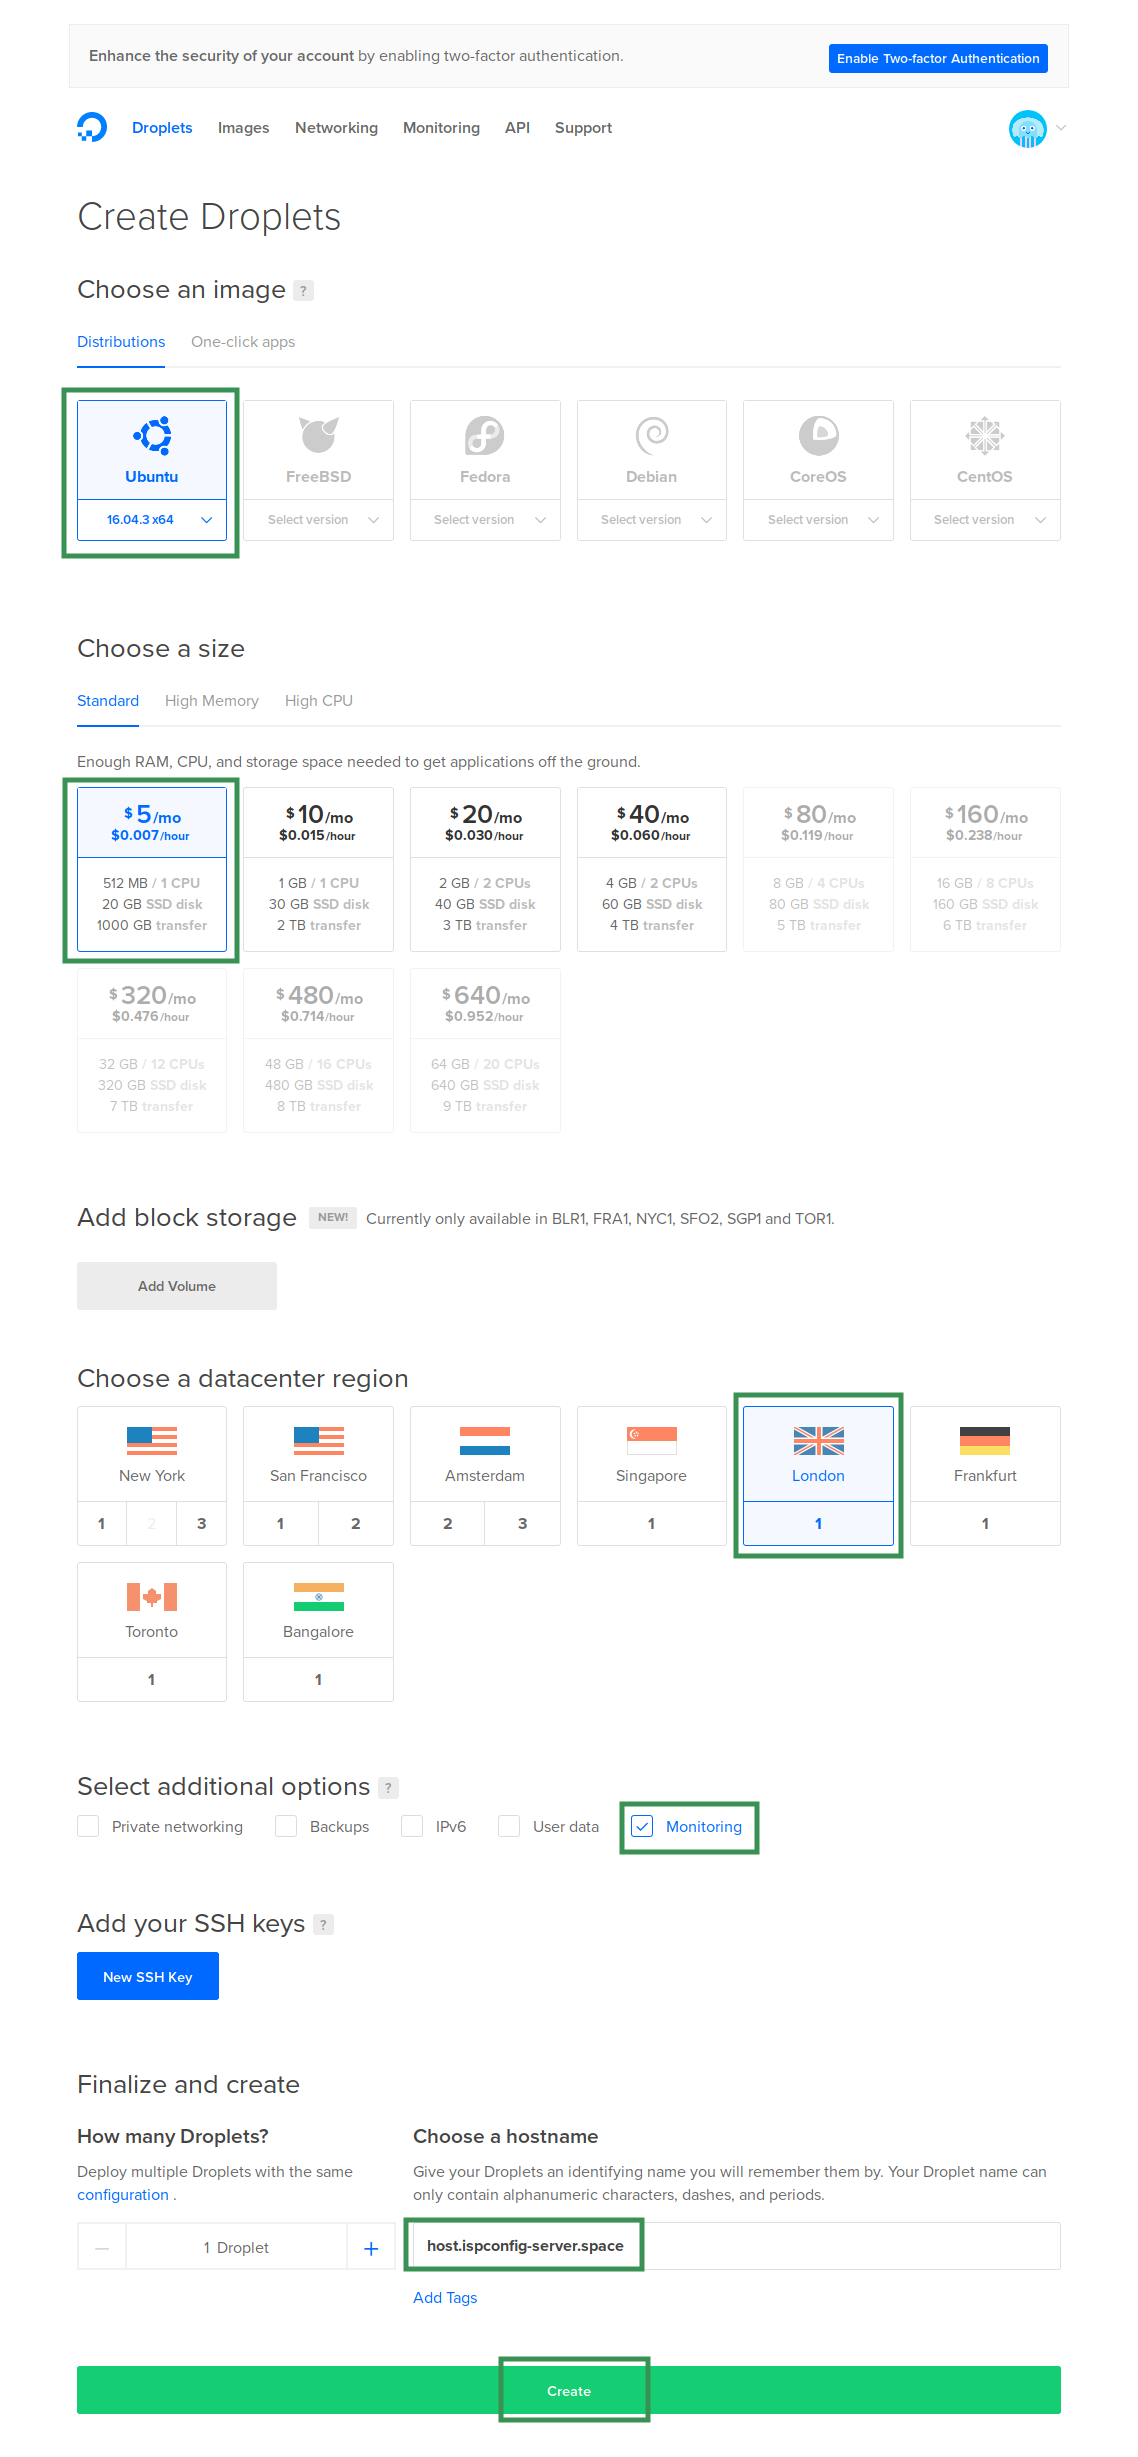
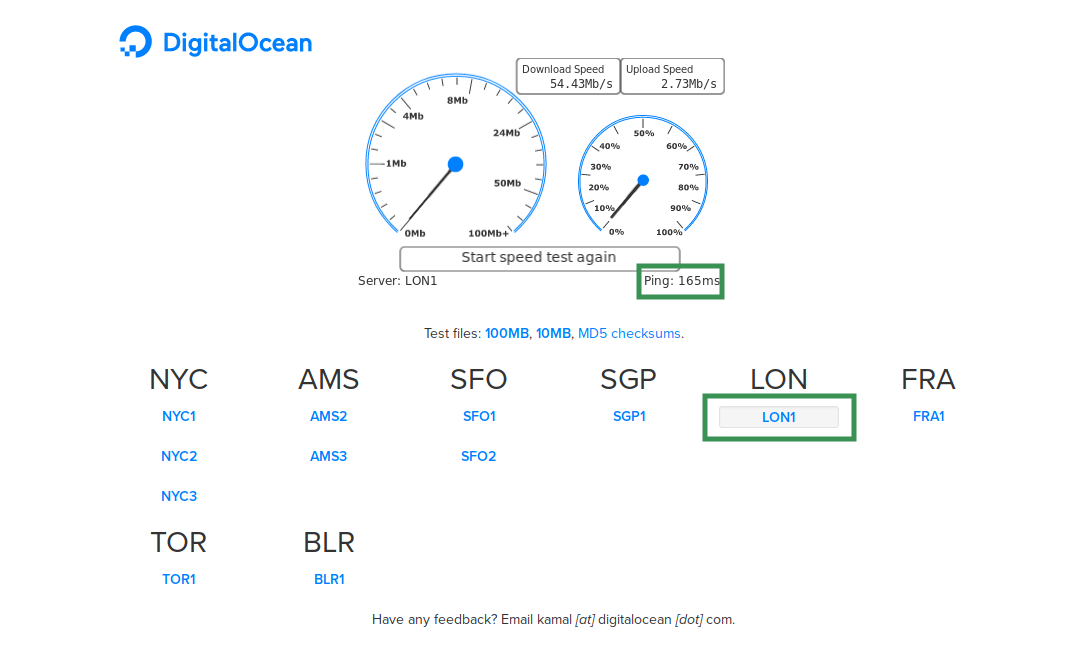
I would suggest London as data center location, because it is the closest server to Kenya in terms of latency. In case you are not from Kenya, please run a test at http://speedtest-lon1.digitalocean.com/ and pick the server with the least ping.
In regards of the Host name. Please choose a sub-domain. Never use a full domain as host-name for a server. You can name it magic-box.your-domain.tld, unicorn.your-domain.tld, matatu.your-domain.tld or what ever suits you best. But don’t name it: your-domain.tld.
Last but not least, click the green „Create“ button. Your server will now be created for you.
Creating DNS Records for your domain with Digital Ocean Name Servers
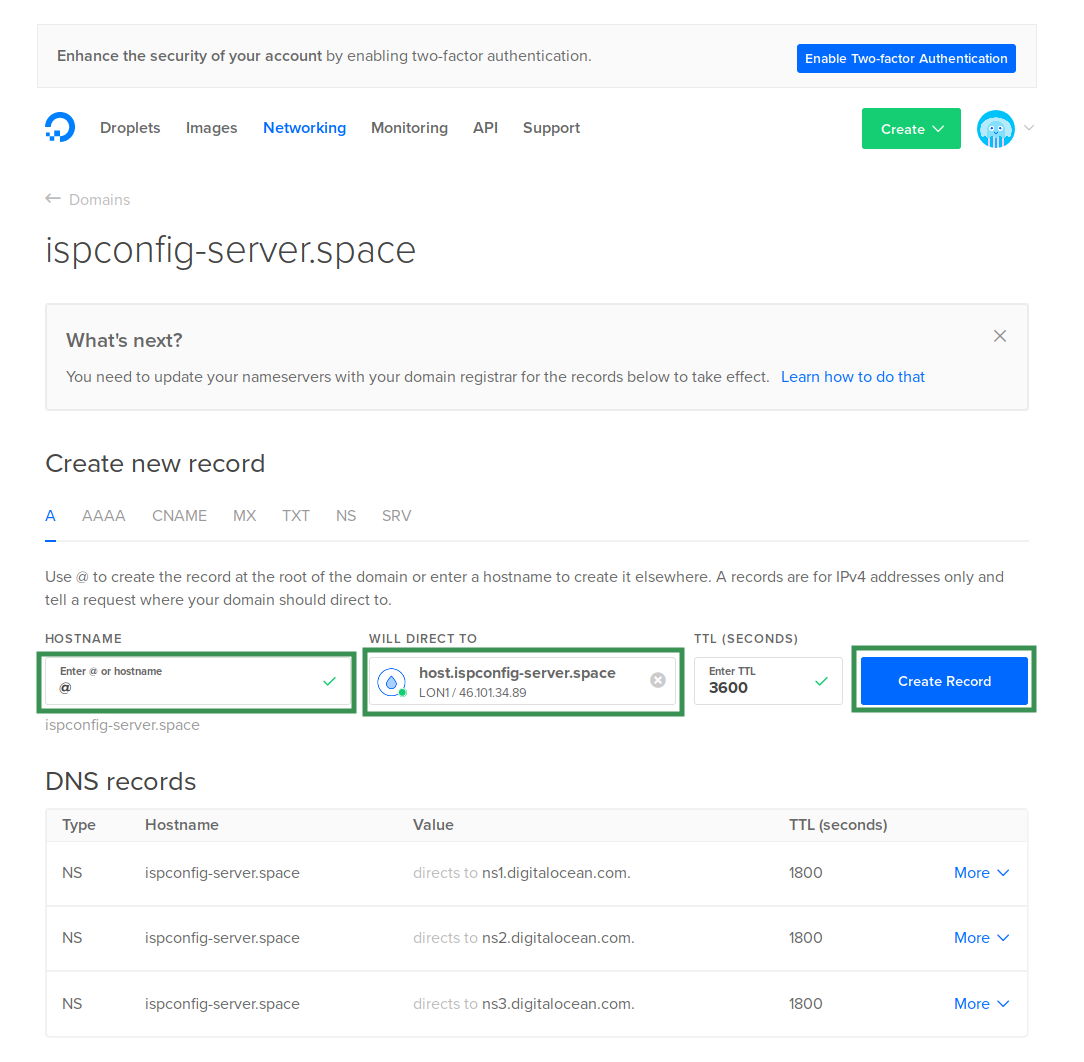
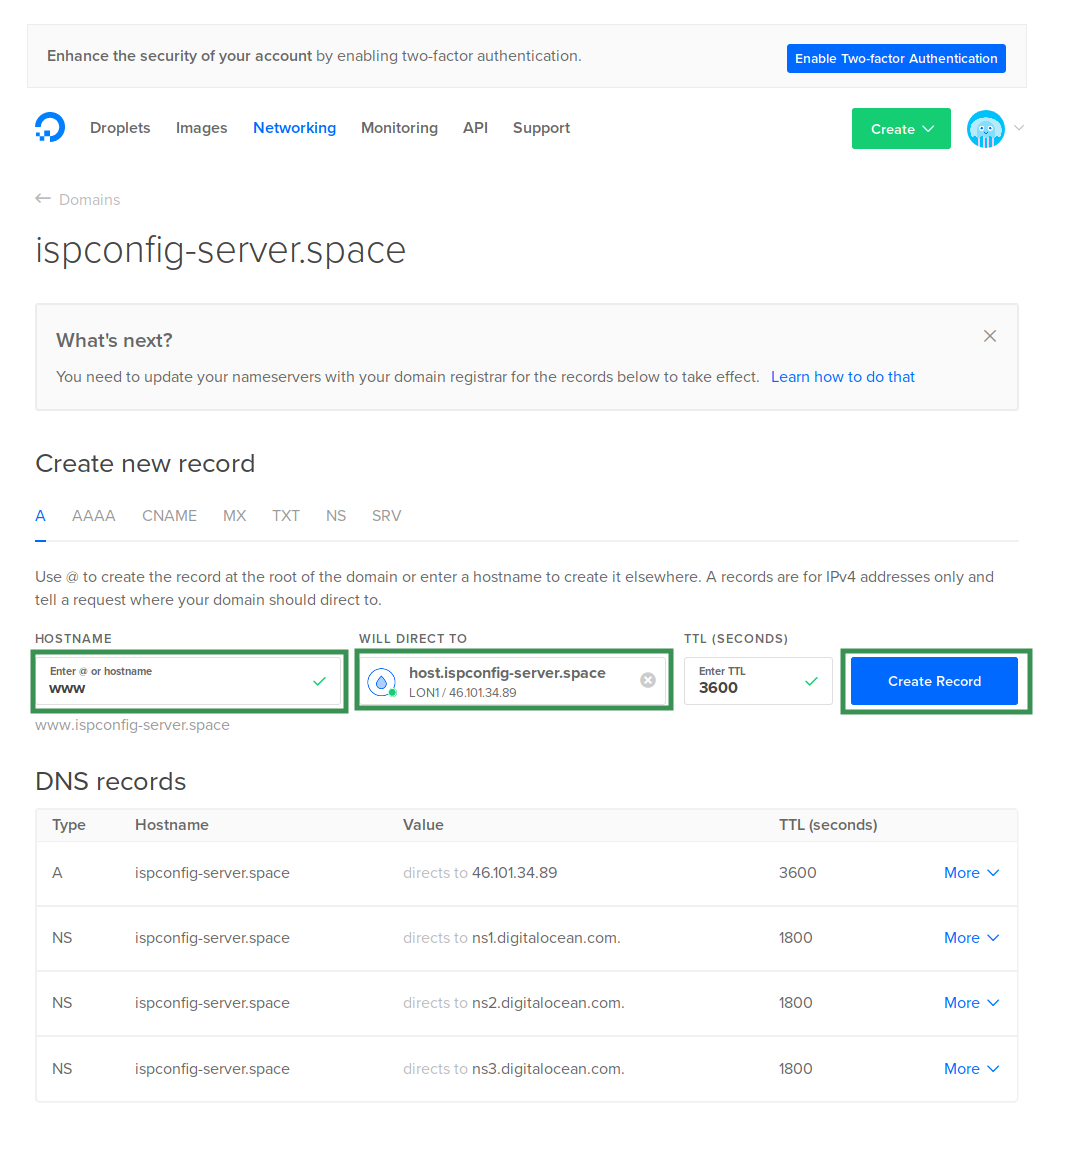
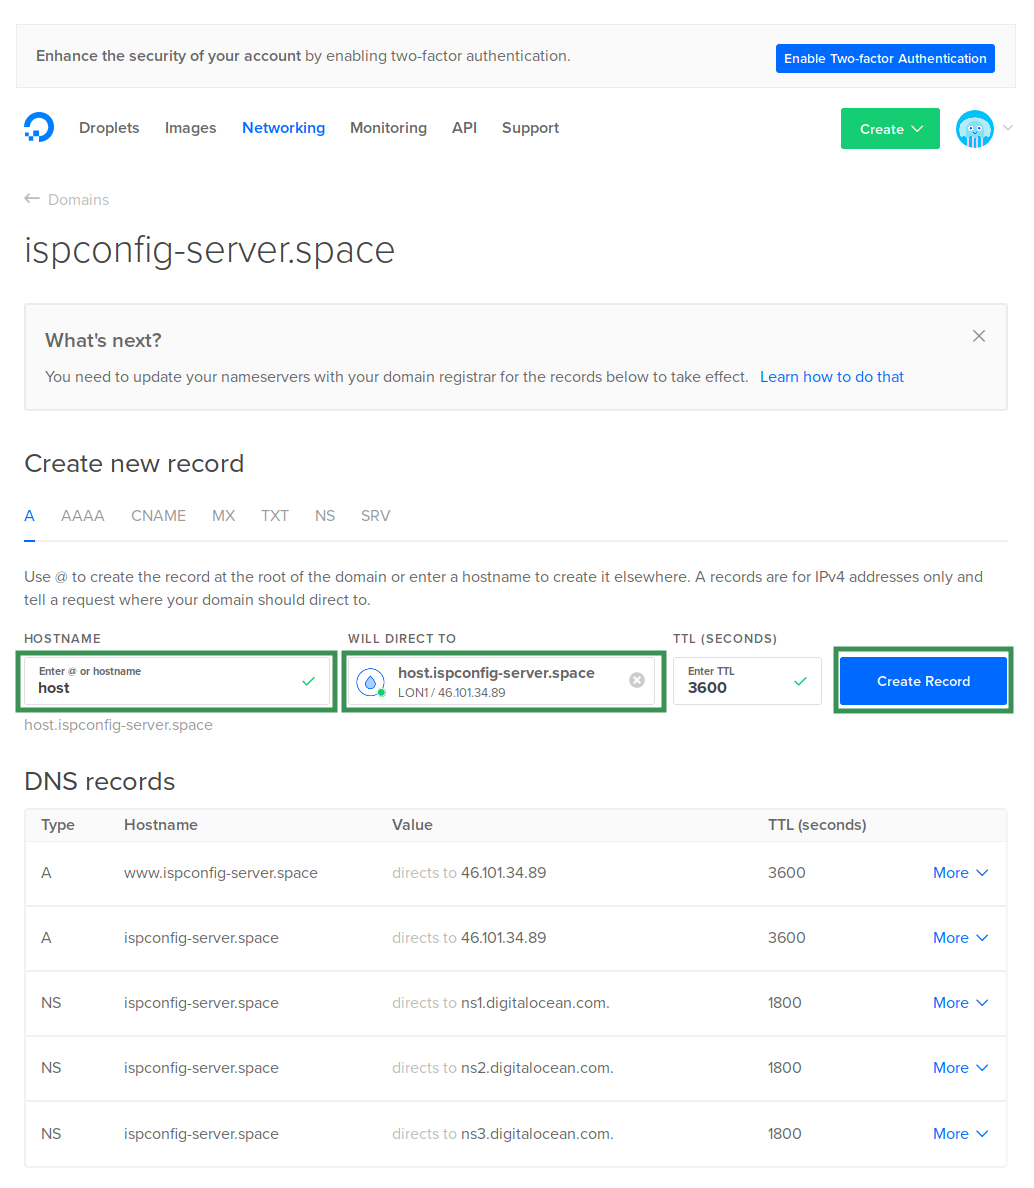
In Digital Ocean, click now „Networking“ on the top of the page. It will ask you to enter a domain. Now, here you have to enter your-domain.tld only and click „Add Domain“. Next you will find some strange looking things. Don‘t worry, I will guide you.
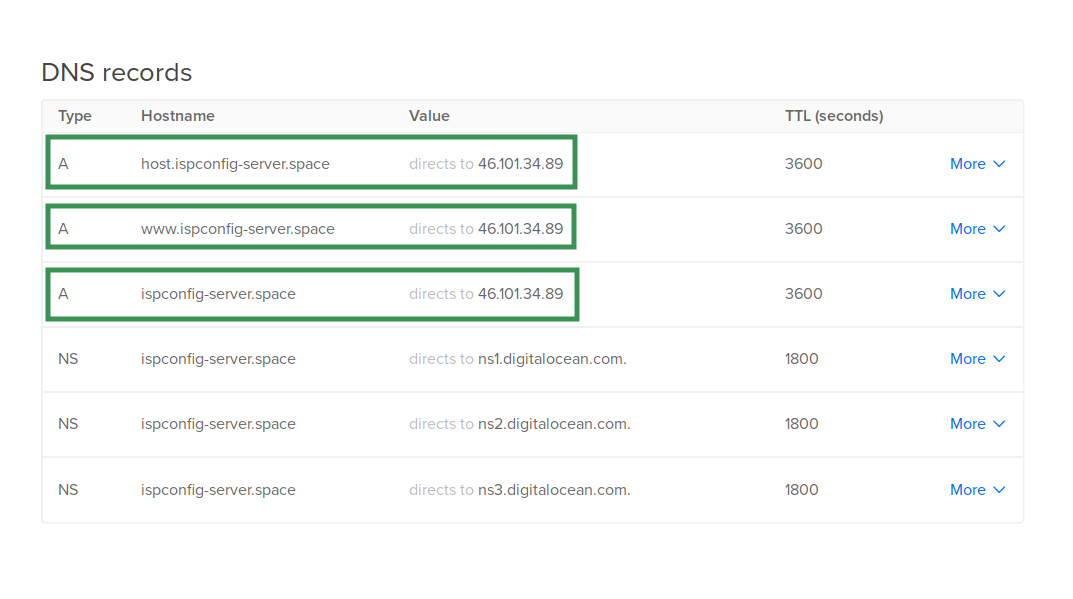
In „Hostname“ enter @ and then click in the field below „Will Direct To“ and it should show you your just created server. Click on it. And then click „Create Record“. Then you need to create another record. So in Hostname enter „host“ and in „Will Direct to“ choose again, your newly created server and click „Create Record“ again. And last but not least, enter „www“ in Hostname, choose your server again, and click on create record. Make sure it looks like in the screen shots.
In case you have not done yet, please make sure the domain you want to use, has:
ns1.digitalocean.com
ns2.digitalocean.com
ns3.digitalocean.com
set as nameservers. In case you have no clue, just get in touch with your provider and he will guide you and help you with doing it.
Strong Passwords for the Server
Owning a Server, means taking responsibility. Responsibility in terms of protecting your server. The least you should do, is to use strong passwords, no matter how hard they are to remember, or how long they are. When I find one of you using a password that looks like a date of birth, your favorite car brand or so. I will come and punish you for that! Just kidding.
For the server, we will need three strong passwords. The passwords need to be different. Therefore we will use a site to generate three strong passwords. So, Mama Mboga, please open the web site: https://xkpasswd.net/s/. And look for „LOAD/SAVE CONFIG“.
Click on „LOAD/SAVE CONFIG“ and paste the following content into the text field below:
{
 "num_words": 3,
 "word_length_min": 4,
 "word_length_max": 8,
 "case_transform": "ALTERNATE",
 "separator_character": "X",
 "padding_digits_before": 2,
 "padding_digits_after": 2,
 "padding_type": "FIXED",
 "padding_character": "X",
 "padding_characters_before": 2,
 "padding_characters_after": 2,
 "random_increment": "AUTO"
}
Then click on the „Load Config“ button. And then you click on Generate 3 Passwords, and the tool will show you three, quite strong passwords.
Open a Text document on your PC and Copy/Paste the three passwords in the text file, and choose one password for each login type. What we need, are passwords for: Server Root, SQL Root and a ISPConfig Admin password. You can make it look like this:
Server Root
XX35XfinlandXOBJECTXcoastX47XX

SQL ROOT
XX17XwroteXSEEDXtwentyX34XX

ISPConfig Admin
XX36XbottleXMATERIALXlandX24XX
Please make sure you save this passwords and keep them safe. This passwords are the key to your servers door, and you want to make sure that nobody just passes by and walks in and out.
Connecting with the Server
Have a look in your emails. By now, you should have received an email from Digital Ocean with the login details to your server. To be able to connect to your server from a Windows PC, you need to download and install a program called Putty.
Install Putty on your Windows PC
To be able to connect to your server, you will need to install a program that‘s called Putty on your Windows PC. Got to this site https://www.chiark.greenend.org.uk/~sgtatham/putty/latest.html and download the latest version of Putty (in doubt, download:putty-0.70-installer.msi). When Putty is downloaded, double click the downloaded file to run the installation process. After the installation is finished, simply find Putty in your Programs and double click it. When Putty is opened, you will find the host field.
Just copy and paste the IP Address of your Server into the host field, and click „Connect“ in Putty. It will show you a strange looking error message: „The server‘s host key is not cached in the registry […]“ Just click „Yes“ to confirm the warning message.
You will then see: „Login as:“, just enter „root“ and hit the enter key. Now you will be asked for the password. You will find the password to your server in the email as well. You might find it strange, but you enter the password and the cursor is not moving at all, it is just blinking. Don‘t worry about that. This is a Linux security feature to hide the length of your password.
I‘m sure you‘ve tried to right-click and paste the password, but it didn’t show you anything. And you have the same result when you use ctrl+c and ctrl+v to copy and paste it and you don‘t see whether it was working or not. Well, in Windows, you can copy a text, then you hover your mouse over the terminal window, and just make a right-click on your mouse, and the text is pasted. In case of the password, copy the password from your email, hold the mouse over the putty window, make a right-click and hit the enter key. And tadahhh. You are logged in. When it didn‘t work the first time, just try it again.
Digital Ocean forces you to create a new password after the first login. So you will be asked to enter the current password again (the one from the email) and then enter a new password (use the Root password from the text file) and then re-enter the new root password again, to change it.
Wonderful. You are doing great! You have just created your first server and logged into it successfully. Amazing.
To prepare you for the following chapter, you need to know some little things.
- I will call the Putty window, just plain putty, to make it a bit easier.
- Copy and paste the commands from the following chapter LINE by LINE and paste it into putty.
- Make sure you paste a command and wait for it to finish, before you enter the next command.
- Hit the Enter key on your keyboard after every command you have pasted into putty.
- In some cases you need to navigate like in a menu, to do that, you use your keyboard and the following keys on your keyboard.
- TAB (Two arrows showing left and right on your left hand side)key = Used to navigate between elements
- SPACE bar = used to choose / check elements
- Enter = to submit a command or to „click a button“
- Arrow keys = to scroll up, down, left or right
- To edit files, we will use a program called nano. To save a document / file with nano, you use:
- CTRL+o (this is a lowercase o, not zero) to save document
- CTRL+x to close a document
- CTRL+w to search in the document for a phrase or word
- CTRL+c to show the current line number
- To navigate within the document you use just the arrow keys on your keyboard.
Installing and configuring the Web Server Setup
Now you have made it to the main part. That is great!
The first command you have to enter is:
apt update && apt upgrade -y
this command will check for the latest updates on your server, download them and install them. This might take a minute or two.
The you need to enter this command:
dpkg-reconfigure dash
You will be asked: „Use dash as the default system shell (/bin/sh)“. Just use the arrow key to select NO and hit the enter button to confirm your choice.
The next command to enter is:
dpkg-reconfigure locales
This one will ask you to make some choices.
The first one is: „Locales to be generated:“, just hit the space bar on your keyboard to select „All locales“, then hit the TAB key on your keyboard, select <Ok> and hit enter to confirm your choice. In the next question, you will fine „en_US.UTF-8“ and <Ok> pre-selected. Just hit the enter key to submit the command. Processing this command will take some time. About 10 to 15 minutes.
To set the correct time zone of the server, and let the server know where it is located, you need to run this command:
dpkg-reconfigure tzdata
It will ask you some questions as well. In the first one you have to define the geographic location of the server. So you want to choose Europe here.
In the next window, you find a list of cities in Europe. The server is located in London, so you have to select London here, and confirm your choice with OK.
The next command you have to enter is to install some packages. So, enter:
apt install ntp ntpdate fail2ban ufw -y
and let it finish.
Then you have to enter this commands:
service apparmor stop
update-rc.d -f apparmor remove
apt remove apparmor apparmor-utils
You will be asked: „Do you want to continue?“ and you can either enter a „y“ and hit enter, or just hit enter. So just hit enter to confirm your choice.
Now we have to reboot the server once. To do that, you need to enter the command:
reboot
and the server will restart. Just give him about 2 minutes to reboot and then you can connect again to your server via Putty, just like you did in the beginning, just that you will use the new Password from your list.
To make sure all unnecessary packages will be removed, you want to run this command:
apt autoremove -y
and it will remove things that we don’t need anymore.
Now we need to install the database server application on the server. We do that with this command:
apt install mariadb-client mariadb-server -y
When it is finished, then you we need to change a little thing in the configuration for the database server. For this, you enter:
nano /etc/mysql/mariadb.conf.d/50-server.cnf
Now you find yourself in “nano” the Linux default text editor I mentioned before. You can navigate there with your arrow keys on the keyboard. You need to find the line:
bind-address = 127.0.0.1
It should be in the upper part. When you found it, just set a “#” in front of the line. Make it look like:
# bind-address = 127.0.0.1”
To save the changes, you want to hit CTRL+o on your keyboard. Then you can exit nano with pressing: CTRL+x on your keyboard.
With the next command, we will set a password for the Database ROOT user. Therefore you need to run this command:
mysql_secure_installation
and it will also come up with some questions. The first one is:
Enter current password for root (enter for none):
You can just hit enter there, because we haven’t yet defined a password for the database (MySQL) root user. The next question is:
Set root password?
You can just hit enter to say “Yes”. In the next step it will ask you to enter a new password for the MySQL root user:
New password:
Now take a look at your passwords list, and enter (Copy/Paste) the “SQL ROOT” password from your list in there and confirm with enter. Enter the password again when asked:
Re-enter new password:
and hit enter on your keyboard.
Remove anonymous users?
Hit enter to say yes.
Disallow root login remotely?
Hit enter to say yes.
Remove test database and access to it?
Hit enter to say yes.
Reload privilege tables now?
Hit enter to say yes.
To make sure all changes will be applied correctly, and there is no mistake in the configuration, you have to run this command:
service mysql stop && service mysql start
which will restart the database server application.
Now we need to install a bunch of software on the server. You will install now the web server and all the components needed to run and deliver your future WordPress blog. The command is:
apt install apache2 apache2-doc apache2-utils libapache2-mod-php libapache2-mod-geoip php7.0 php7.0-common php7.0-gd php7.0-mysql php7.0-imap php7.0-cli php7.0-cgi libapache2-mod-fcgid apache2-suexec-pristine php-pear php-auth php7.0-mcrypt mcrypt imagemagick libruby libapache2-mod-python php7.0-curl php7.0-intl php7.0-pspell php7.0-recode php7.0-sqlite3 php7.0-tidy php7.0-xmlrpc php7.0-xsl memcached php-memcache php-imagick php-gettext php7.0-zip php7.0-mbstring php7.0-opcache php-apcu libapache2-mod-fastcgi php7.0-fpm
confirm afterwards with “y” and hit enter and the server will install all those strange looking things. This also might take a little while.
When the previous command is done, you need to enable some modules for the web server. Issue this command:
a2enmod suexec rewrite ssl actions include cgi suexec rewrite ssl actions include cgi actions fastcgi alias headers expires cache geoip
In the next step you need to create a configuration file for the web server. Run the command:
nano /etc/apache2/conf-available/httpoxy.conf
You will see a blank document. Paste this content:
<IfModule mod_headers.c>
RequestHeader unset Proxy early
</IfModule>
then press CTRL+o on your keyboard. At the very bottom of your putty window, you will find a line asking you “filename to write: /etc/apache2/conf-available/httpoxy.conf” hit the enter key on your keyboard to create this file, and then hit CTRL+x to close nano.
Then you need to run this command:
a2enconf httpoxy
Even you are being told that you need to restart apache, don’t worry, we will do that later. Now we want to install mod pagespeed to give your site some extra performance. Therefore you need to enter this commands:
cd /tmp/
wget https://dl-ssl.google.com/dl/linux/direct/mod-pagespeed-stable_current_amd64.deb
dpkg -i mod-pagespeed-stable_current_amd64.deb
and it will install mod pagespeed on your server.
In the next step, we need to turn off mod pagespeed server wide. In case you want to host something else on your server, that does conflict with mod pagespeed, you will be on the better side. So, issue this command:
nano /etc/apache2/mods-available/pagespeed.conf
in the very top of the file you should find:
ModPagespeed on
change that line to:
ModPagespeed off
and save the file with: CTRL+o and exit with CTRL+x. (Don’t worry, I will show you later, how you enable Mod Pagespeed for your Blog)
In the next step (this is optional) you can install phpMyAdmin. phpMyAdmin is a tool that gives you a visual user-interface to maintain databases. It makes it easy to import or export databases and allows you also to alter them. I find it very useful for certain operations. When you think, you will never need it, then you can skip this step. But I would recommend installing it. In case you need to export your database any time soon, you will really prefer doing it from the web browser.
So, to install phpMyAdmin you run this command:
apt install phpmyadmin
confirm with “y” and hit enter to run the installation. During the installation you will be asked:
Which web server to reconfigure automatically
Select “apache2”, hit the space bar to choose it, then hit the TAB key, and confirm with OK.
Configure database for phpmyadmin with dbconfig-common?
Select NO and hit enter.
In the next step we need to alter the phpMyAdmin configuration. Run this command:
nano /etc/phpmyadmin/apache.conf
In the 3rd line you should see:
Alias /phpmyamdmin /usr/share/phpmyadmin
change this line to:
Alias /data-base-ui /usr/share/phpmyadmin
then safe the file with CTRL+o and exit it with CTRL+x
After the tutorial, you will be able to open phpMyAdmin with: your-domain.tld/data-base-ui and login with a database user-name and password. I would highly recommend changing “data-base-ui” in the configuration file, to something really unique to prevent password guessing attacks. To stick with the Mama Mboga example, you maybe want to change it to “spinach-base”. Then your configuration should look like:
Alias /spinach-base /usr/share/phpmyadmin
and you can access phpMyAdmin from your-domain.tld/spinach-base/.
After that, you want to restart the web server with:
service apache2 restart
To be able to get free SSL certificates, we need to install a tool called Let’s Encrypt. We install it with this command:
apt install letsencrypt -y
For you to be able to upload your WordPress blog to the server, we need to install a FTP server application. For this, you need to run this command:
apt install pure-ftpd-common pure-ftpd-mysql
and confirm with a “y” and hit the enter key to install it.
Then we need to alter the configuration file with:
nano /etc/default/pure-ftpd-common
around line 14 you will find:
VIRTUALCHROOT=false
you need to change that line to:
VIRTUALCHROOT=true
Then you can save the file and exit it.
In the next step, we need to tell the FTP server application, that we also want to login and upload and download files using a secure connection. We do that with the following commands:
echo 1 > /etc/pure-ftpd/conf/TLS
mkdir -p /etc/ssl/private/
openssl req -x509 -nodes -days 7300 -newkey rsa:2048 -keyout /etc/ssl/private/pure-ftpd.pem -out /etc/ssl/private/pure-ftpd.pem
Now the last command will ask you some questions, which you can answer all with just hitting the enter key on your keyboard.
Country Name (2 letter code) [AU]: <== Enter.
State or Province Name (full name) [Some-State]:<== Enter.
Locality Name (eg, city) []:<== Enter.
Organization Name (eg, company) [Internet Widgits Pty Ltd]:<== Enter.
Organizational Unit Name (eg, section) []:<== Enter.
Common Name (eg, YOUR name) []:<== Enter.
Email Address []:<== Enter.
Now you need to issue this command:
chmod 600 /etc/ssl/private/pure-ftpd.pem
We need to tell the FTP server application, that we want to limit the ports it is using with:
nano /etc/pure-ftpd/conf/PassivePortRange
enter there:
29799 29899
Save the file, and exit it.
And now we need to restart the FTP server application with:
service pure-ftpd-mysql restart
In the next step we need to install some statistic tools with:
apt install vlogger webalizer awstats geoip-database libclass-dbi-mysql-perl
then you have to alter a configuration file with:
nano /etc/cron.d/awstats
You will need to set a “#” in-front of every line. Make it look like this:
#MAILTO=root
#*/10 * * * * www-data [ -x /usr/share/awstats/tools/update.sh ] && /usr/share/awstats/tools/update.sh
# Generate static reports:
#10 03 * * * www-data [ -x /usr/share/awstats/tools/buildstatic.sh ] && /usr/share/awstats/tools/buildstatic.sh
Save and exit the file.
In the next step we need to install this packages:
apt install build-essential autoconf automake1.11 libtool flex bison debhelper binutils -y
and then run this commands:
cd /tmp/
wget http://olivier.sessink.nl/jailkit/jailkit-2.19.tar.gz
tar xvfz jailkit-2.19.tar.gz
cd jailkit-2.19
./debian/rules binary
cd ..
dpkg -i jailkit_2.19-1_*.deb
rm -rf jailkit-2.19*
Now we will take care of your server’s security. We will configure a programm called Fail2Ban. Fail2Ban will block IP addresses that have entered the wrong passwords to often for certain services. And with that, your WordPress Blog is protected too. So, lets first create the configuration file we need with:
nano /etc/fail2ban/jail.local
In this file you can paste the following:
[DEFAULT]
# "ignoreip" can be an IP address, a CIDR mask or a DNS host
ignoreip = 127.0.0.1/8
bantime  = 43200
maxretry = 3
action = %(action_mwl)s
findtime = 3600

[sshd]
enabled  = true
port     = ssh
filter   = sshd
logpath  = /var/log/auth.log

[pure-ftpd]
enabled  = true
port     = ftp
filter   = pureftpd
logpath  = /var/log/syslog

[wordpress-hard]
enabled = true
filter = wordpress-hard
logpath = /var/log/auth.log
maxretry = 3
port = http,https
bantime  = 600
findtime = 600

[framework-ddos]
enabled = true
port = 80,443
protocol = tcp
filter = framework-ddos
logpath = /var/log/apache2/other_vhosts_access.log
maxretry = 50
findtime = 600
bantime  = 604800
Save the file and close it.
Then you have to create this configuration file:
nano /etc/fail2ban/filter.d/pureftpd.conf
and enter there:
[Definition]
failregex = .*pure-ftpd: \(.*@<HOST>\) \[WARNING\] Authentication failed for user.*
ignoreregex =
Save and exit the file. Then create:
nano /etc/fail2ban/filter.d/wordpress-hard.conf
and paste this content into it:
# Fail2Ban filter for WordPress hard failures
#
[INCLUDES]
before = common.conf
[Definition]
_daemon = (?:wordpress|wp)
failregex = ^%(__prefix_line)sAuthentication attempt for unknown user .* from <HOST>$
            ^%(__prefix_line)sBlocked user enumeration attempt from <HOST>$
            ^%(__prefix_line)sBlocked authentication attempt for .* from <HOST>$
            ^%(__prefix_line)sPingback error .* generated from <HOST>$
            ^%(__prefix_line)sSpam comment \d+ from <HOST>$
            ^%(__prefix_line)sXML-RPC authentication attempt for unknown user .* from <HOST>$
            ^%(__prefix_line)sXML-RPC multicall authentication failure from <HOST>$
ignoreregex =
# DEV Notes:
# Requires the 'WP fail2ban' plugin:
# https://wordpress.org/plugins/wp-fail2ban/
#
# Author: Charles Lecklider
To make sure every WordPress blog running on your server is protected by Fail2Ban, you need to install for every WordPress blog this Plugin: https://wordpress.org/plugins/wp-fail2ban/
And now we need to create this file:
nano /etc/fail2ban/filter.d/framework-ddos.conf
and paste this content into it:
[Definition]
failregex = .*:(80|443) <HOST> .*(GET|POST) .*/xmlrpc.php
            .*:(80|443) <HOST> .*(GET|POST) .*/wp-login.php
            .*:(80|443) <HOST> .*(GET|POST) /administrator/index.php HTTP
save the file, and exit it. Now you need to restart Fail2Ban with:
service fail2ban restart
In the next step we will install ISPConfig on the server. ISPConfig is a application that allows you to manage your sites, databases, FTP accounts, and basically the whole server from your web browser.
Run these commands:
cd /tmp
wget http://www.ispconfig.org/downloads/ISPConfig-3-stable.tar.gz
tar xfz ISPConfig-3-stable.tar.gz
cd ispconfig3_install/install/
You can start the installation of ISPConfig with this command (During the installation you will be asked certain questions):
php -q install.php
--------------------------------------------------------------------------------
 _____ ___________   _____              __ _         ____
|_   _/  ___| ___ \ /  __ \            / _(_)       /__  \
  | | \ `--.| |_/ / | /  \/ ___  _ __ | |_ _  __ _    _/ /
  | |  `--. \  __/  | |    / _ \| '_ \|  _| |/ _` |  |_ |
 _| |_/\__/ / |     | \__/\ (_) | | | | | | | (_| | ___\ \
 \___/\____/\_|      \____/\___/|_| |_|_| |_|\__, | \____/
                                              __/ |
                                             |___/
--------------------------------------------------------------------------------


>> Initial configuration

Operating System: Ubuntu 16.04.3 LTS (Xenial Xerus)

Following will be a few questions for primary configuration so be careful.
Default values are in [brackets] and can be accepted with <ENTER>.
Tap in "quit" (without the quotes) to stop the installer.


Select language (en,de) [en]: <== Enter

Installation mode (standard,expert) [standard]:<== Enter

Full qualified hostname (FQDN) of the server, eg server1.domain.tld  [host.ispconfig-server.space]:<== Enter

MySQL server hostname [localhost]:<== Enter

MySQL server port [3306]:<== Enter

MySQL root username [root]:<== Enter

MySQL root password []: XX17XwroteXSEEDXtwentyX34XX <== Enter your SQL ROOT password here

MySQL database to create [dbispconfig]:<== Enter

MySQL charset [utf8]:<== Enter

[INFO] service Postgrey not detected
[INFO] service Postfix not detected
[ERROR] Postfix not installed - skipping Mail
Configuring Jailkit
Configuring Pureftpd
[INFO] service BIND not detected
[INFO] service MyDNS not detected
Configuring Apache
Configuring vlogger
[INFO] service OpenVZ not detected
Configuring Ubuntu Firewall
[INFO] service Metronome XMPP Server not detected
Configuring Fail2ban
Configuring Apps vhost
Installing ISPConfig
ISPConfig Port [8080]:<== Enter

Admin password [admin]: XX36XbottleXMATERIALXlandX24XX <== Enter your ISPConfig Admin Password here

Re-enter admin password []: XX36XbottleXMATERIALXlandX24XX <== Confirm your ISPConfig Admin Password

Do you want a secure (SSL) connection to the ISPConfig web interface (y,n) [y]:<== Enter

Generating RSA private key, 4096 bit long modulus
..................................................................................................................................................................................................................................................................................................++
.........................................................++
e is 65537 (0x10001)
You are about to be asked to enter information that will be incorporated
into your certificate request.
What you are about to enter is what is called a Distinguished Name or a DN.
There are quite a few fields but you can leave some blank
For some fields there will be a default value,
If you enter '.', the field will be left blank.
-----
Country Name (2 letter code) [AU]: <== Enter
State or Province Name (full name) [Some-State]: <== Enter
Locality Name (eg, city) []: <== Enter
Organization Name (eg, company) [Internet Widgits Pty Ltd]: <== Enter
Organizational Unit Name (eg, section) []: <== Enter
Common Name (e.g. server FQDN or YOUR name) []: <== Enter
Email Address []: <== Enter

Please enter the following 'extra' attributes
to be sent with your certificate request
A challenge password []: <== Enter
An optional company name []: <== Enter
writing RSA key
_

Configuring DBServer
Installing ISPConfig crontab
Installing ISPConfig crontab
no crontab for root
Detect IP addresses
Restarting services ...
Installation completed.
Woow. That’s it. You are amazing. Fantastic. You have just build your own and first web server.
Now I will show you how you configure some little basics in ISPConfig and in the last step I will show you how you install your WordPress blog on your own web server and optimize it.
Configure ISPConfig
Now, to configure ISPConfig start your web browser and navigate the browser to: https://host.your-domain.tld:8080
You will find a message telling you, that “Your connection is not secure”. This message is OK, because the certificate we use for the ISPConfig Interface is self signed and all browsers issue a warning message in this case.
In Firefox and chrome you should find a “Advanced” button or link. Click it, and you should be able to add a exception. After adding the exeption you should be greeted by ISPConfig with asking you for User-name and password.
Enter “Admin” as user-name and your ISPConfig Admin password and login.
First you need to click System => Server IP addresses and delete the entry for the IP address that begins with 10.xx.xx.xx. Confirm to delete this entry. Then you want to click on CP Users => admin.
You can disable:
- Help
- Client
- Tools
- VM
- DNS
and then click on “Save”.
Log out and log in again and you will see only the options you really need.
Next you go to: System => Main Config and select the “Sites” tab on top. In the middle of the site you should find PHPMyAdmin URL. Change the value to what you have chosen for your phpMyAdmin URL (spinach-base / data-base-ui/) and click “Save”.
Then you go to: Server Config and choose select the “Web” tab. Scroll down a bit and disable: Enable IP wildcard (*). Click on SSL Settings down below and enable “Skip Lets Encrypt Check”. Click on PHP Settings, and set: Default PHP Hander: Fast-CGI. Now click on “Save”
Click on Firewall on your left hand side, and click on “Add Firewall record”. You will find “Open TCP ports” being pre-set. Make sure you delete everything from there, and enter:
20,21,22,53,80,443,3306,8080,8081,10000,29799:29899
to make sure that only the necessary ports are being opened for your web server.Then click on “Save”
Now you will be prepared to install your WordPress blog 😉
Click on the “Sites” tab on top of the page and click on “Add new web site”
Enter your domain (your-domain.tld) in the “Domain” field. Select www at Auto-Subdomain. Check the box at Let’s Encrypt SSL (it will also enable the SSL check box above. In case the PHP Version is not selected, just choose default there and click on save.
You should find your site now in the list and a number with a red round background flashing on the very top of the page. This means, that the process is not yet finished. Wait for about one minute and the number should disapear. Once it is gone, your changes / additions / modifications have been applied. Now click on your site again, and click the “Redirect” tab on top. There you want to enable: Rewrite HTTP to HTTPS and at SEO Redirect you want to select: domain.tld => www.domain.tld to make sure your site will be available via www.your-domain.tld only. Click Save and wait for the process to finish.
Then click on your domain again and choose the “Backup” tab. Set the Backup interval to “Daily” and Number of backup copies to “5”. This will create a backup of your site and database once a day at night and you will always have backups of your site from the last 5 nights.Click on “Save” to apply.
Now we need to create:
- A Database User and Password
- A Database
- A FTP User and Password.
Make sure you copy and paste the passwords and user-names in your text file with the passwords. Mine looks like below. It is a bit sorted, so that I know what is for what.
Server Root
XX35XfinlandXOBJECTXcoastX47XX

SQL ROOT
XX17XwroteXSEEDXtwentyX34XX

ISPConfig Admin
XX36XbottleXMATERIALXlandX24XX

DataBase Details:
WordPress Database User:
WordPress Database Password:
WordPress Database Name:


FTP Login Details:
User-name:
Password:
Now click on “Database Users” on your left hand side and click on Add new User. Give the Database user a User-name, and click on Generate password a couple of times. Then copy the password and click on “Save”. Open your text file, and paste the password in there. Open ISPConfig, and you will see the final User-name for the just created database user. Copy that as well and paste it into the text file.
Next click on “Databases” and on “Add new Database”.
At “Site:” make sure to select your site. Then give it a database name and at “Database user:” select the just created Database user. Click on “Save” to submit.
So, my password list looks like this by now:
Server Root
XX35XfinlandXOBJECTXcoastX47XX

SQL ROOT
XX17XwroteXSEEDXtwentyX34XX

ISPConfig Admin
XX36XbottleXMATERIALXlandX24XX

DataBase Details:
WordPress Database User:c0My_WordPress
WordPress Database Password:gzZTx@yN33
WordPress Database Name:c0WordPress


FTP Login Details:
User-name:
Password:
And now in the next step we create the FTP user, so that we can finally upload your WordPress blog to the server.
Click on “FTP-Accounts” on your left and click on “Add new FTP-User” and give it a user-name, a password and make sure you select your site from the drop down list. Make sure you copy the password first and paste it into your text file. Then click on save, and in the overview you will find the final FTP User-name.
My List looks like that now:
Server Root
XX35XfinlandXOBJECTXcoastX47XX

SQL ROOT
XX17XwroteXSEEDXtwentyX34XX

ISPConfig Admin
XX36XbottleXMATERIALXlandX24XX

DataBase Details:
WordPress Database User:c0My_WordPress
WordPress Database Password:gzZTx@yN33
WordPress Database Name:c0WordPress


FTP Login Details:
User-name:defaultFTP-WordPress
Password:vcewuzALEY#E7
Now open a new browser tab and open this link: https://filezilla-project.org/download.php. Hit the green button which says: “Download FileZilla Client” and the download should start.
Navigate to your downloads folder and install FileZilla on your PC.
Then again open your browser and open this site: https://wordpress.org/download You should find a blue download button on your right hand site saying: Download WordPress 4.8.1. Click it to download WordPress.
Go again to your downloads folder, and unzip the file wordpress-4.8.1.zip. You should end up with a new folder called “wordpress” open it.
Now open FileZilla on your PC. On the top of FileZilla you should see fields for:
- Host:
- User-name:
- Password:
- Port:
enter there the following data from your password list:
Host:host.your-domain.tld
User-name:FTP USERNAME
Password:FTP PASSWORD
and click on Quickconnect.
You will get a Warning Window, asking you to confirm the certificate. Confirm it and you will be connected to the web space for your WordPress web site.
Double click on the “web” folder. From there, you can delete this files:
- favicon.ico
- robots.txt
- index.html
and then head over to the WordPress folder in your downloads, and select everything in there, and just drag and drop it into your FileZilla web space. It will not upload your WordPress to your server. Wait for it to finish.
Once the files are uploaded, you can open your site www.your-domain.tld – and you should be greeted with the WordPress installation menu.
When you click on the Padlock next to your web site, you will find that your site is now also using a secured connection.
First select the language of your blog and click on Continue. Then you can click “Let’s go!” Now you have to enter the database details from the passwords text file in the form on your site. Double check if everything is OK and then click “Submit”. WordPress will run a short check and when everything is fine, it will show you the “Run the install” button. Hit it. Set the basics of your blog, and click on “Install WordPress” and bingo. 😉
Your site is now ready.
We want to do one last thing now – which is fine-tuning the performance of your blog. To make you see the difference, go to https://gtmetrix.com/ and enter your URL in the filed. Make sure you enter the whole URL, like: https://www.your-domain.tld and then click on “Analyze”. Let it analyze and check the result. It’s not so bad by now I guess. But it can be better.
Open ISPConfig in your browser and naviagte to Sites => Your Web site => Options tab, scroll down till you see “Custom php.ini settings” and paste there the following configuration
default_charset = UTF-8
upload_max_filesize = 64M
post_max_size = 128M
memory_limit = 64M
and click on “Save”
Now open FileZilla again and make a right-click in your web space. Click on “Create new file” and enter the filename: .htaccess. Then right-click the new .htaccess file, and click on View/Edit. It should open the file in a text editor and paste the following content into the .htaccess file:
# BEGIN WordPress
<IfModule mod_rewrite.c>
RewriteEngine On
RewriteBase /
RewriteRule ^index\.php$ - [L]
RewriteCond %{REQUEST_FILENAME} !-f
RewriteCond %{REQUEST_FILENAME} !-d
RewriteRule . /index.php [L]
</IfModule>

# END WordPress

AddType application/x-font-woff2 .woff2

<IfModule pagespeed_module>
ModPageSpeed on
ModPagespeedEnableFilters trim_urls
ModPagespeedEnableFilters insert_image_dimensions
ModPagespeedEnableFilters recompress_images
ModPagespeedEnableFilters responsive_images
ModPagespeedEnableFilters resize_images
ModPagespeedEnableFilters inline_images
ModPagespeedEnableFilters sprite_images
ModPagespeedEnableFilters collapse_whitespace,remove_comments
</IfModule>

<ifmodule mod_expires.c>
        <Filesmatch "\\.(jpg|jpeg|png|gif|js|css|swf|ico|woff|woff2|mp3|php)$">
                ExpiresActive on
                ExpiresDefault "access plus 1 year"
        </Filesmatch>
</ifmodule>

## BEGIN GZIP Compression ##
<IfModule mod_deflate.c>
AddOutputFilterByType DEFLATE text/plain
AddOutputFilterByType DEFLATE text/html
AddOutputFilterByType DEFLATE text/xml
AddOutputFilterByType DEFLATE text/css
AddOutputFilterByType DEFLATE application/xml
AddOutputFilterByType DEFLATE application/xhtml+xml
AddOutputFilterByType DEFLATE application/rss+xml
AddOutputFilterByType DEFLATE application/javascript
AddOutputFilterByType DEFLATE application/x-javascript
AddOutputFilterByType DEFLATE application/x-httpd-php
AddOutputFilterByType DEFLATE application/x-httpd-fastphp
AddOutputFilterByType DEFLATE image/svg+xml
SetOutputFilter DEFLATE
</IfModule>
## END GZIP Compression ##

<IfModule mod_headers.c>
    <FilesMatch "\\.(ico|jpg|jpeg|png|gif|swf|css|woff|woff2|js)$">
        Header set Cache-Control "max-age=2692000, public"
        Header set Last-Modified "Thu, 1 Jun 2017 00:00:00 GMT"
    </FilesMatch>
    <FilesMatch "\\.(x?html?|php)$">
        Header set Cache-Control "max-age=2692000, private, must-revalidate"
    </FilesMatch>
    Header unset ETag
    Header unset Last-Modified
</IfModule>
now save the file and go back to FileZilla. It will ask you if you want to upload the file. Confirm with OK.
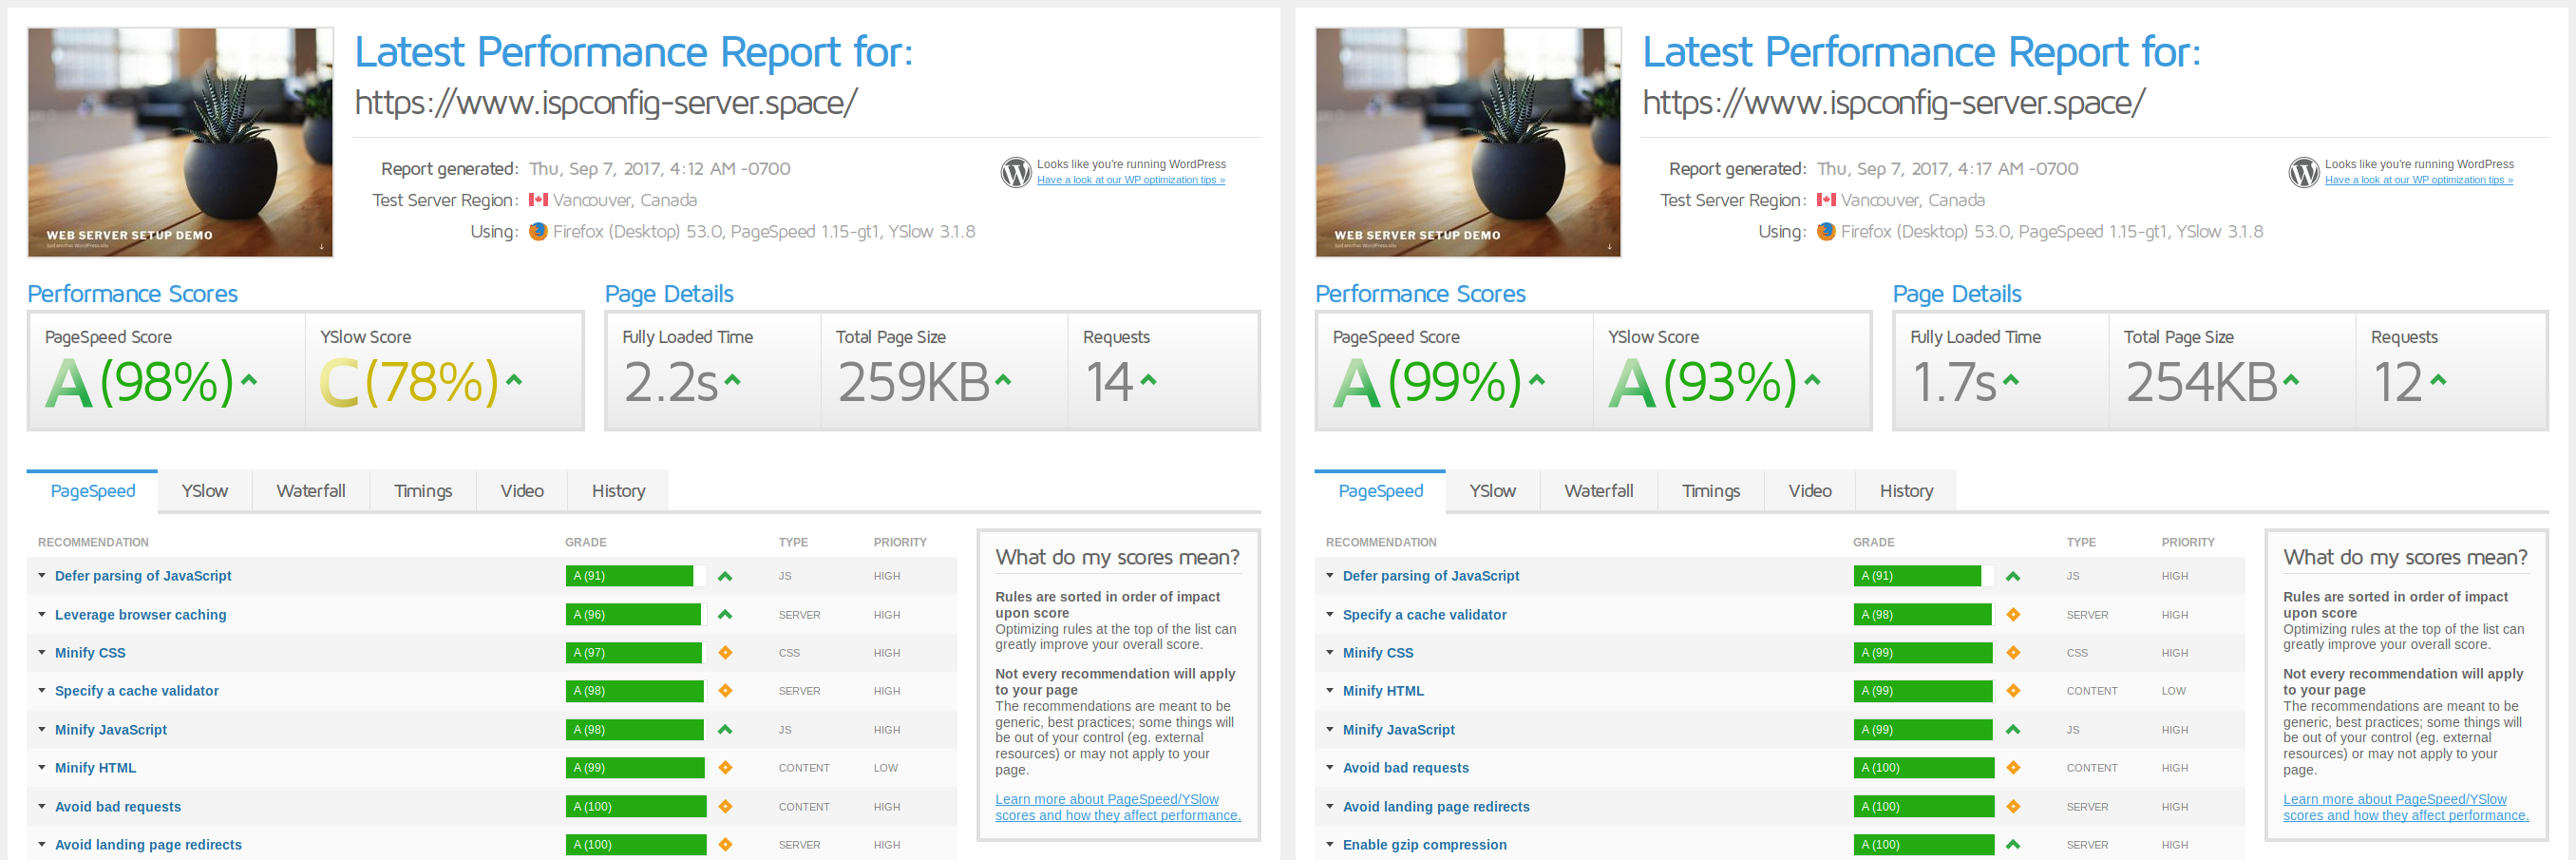
Now open a new browser window, and go to https://gtmetrix.com/ and enter the full URL of your web site again, and hit the analyze button. The performance scores should be much better now.
You did something amazing today. You have registered your own domain. You have created a Digital Ocean server. You setup a entire web server for yourself. You have learned how you upload WordPress to your web space. You have optimized your WordPress blog in terms of performance. Your WordPress blog is protected by the server from password guessing attacks ( after 3 wrong password entries, the server will block the IP for 10 minutes.)
You can be very proud of yourself. In case you have any questions, feel free to ping me using the social media channels on your right hand site.
Thank you very much for your attention and don’t forget to follow me on Facebook and Twitter when you want to get updated about new posts on my blog.
I don’t now which step that I missed, but I encounter 2 problems:
1) The newly created website pointed to normal Apache page instead of ISPConfig page. Upon checking there were some error. So I hv to rename *vhost.err and override the *vhost file. Then edit that file because there is no ip to port 80. So I make it to *.80
2) SSL doesn’t work. It can’t find the https page of the website. I eventually gives up because I don’t know where to look… Haha
Great article by the way! It just that I can’t complete it, eventhough I tried like 5 times already.
It seems very much like there is an issue with the Apache configuration. Did you enter anything in the Apache Directive for that site in ISPConfig ?
Got it! Turn out its my fqdn in ispconfig and dns entry on my nameserver. Everything works now. Can’t get enough to thank you for your awesome article!
Glad you could get it fixed.
Have a great one ..
Then you go to: Server Config and choose select the “Web” ->>> i get invalid hostname
Really good work. Thanks for the blog , saved a lot of time of mine watching 1 or 2 hours video on youtubr.
I had a question for you . Basicly i am hosting websites of my wordpress clients using digitalocean + ispconfig
In your post you have disabled mod pagespeed .
Should we enable it or what should disable it or only enable it to certain client website .
Can you help me our
I usually disable it server-wide and then enable it for each site manually. You will run into troubles with tools like Piwik or others which don’t like Pagespeed or can’t run properly with it being enabled. So rather disable it in the first place, and then re-enable it site by site using the .htaccess file.
i worked on your videos waoo! is a great privilege meeting you here …i had an issue after a successful login to my domain root directory through filezilla i found the web folder, then i uploaded the wordpress folder, expecting to have the greeting message but i didnt get any message, i later deleted all the entire folders and files in the web directory to upload only the files inside the wordpress to the web directory but the result i got now is that my webpage is entirely blank any help please i don’t know maybe i deleted the wrong files and folders maybe i wouldn’t have deleted them
Hey Peter,
once you create a website with ISPConfig, your document root is /var/www/yourwebsite/web/ that is where you should upload the WordPress files in.
Hi Dimitri,
Thank you for your effort in creating this amazing tutorial.
I’m a newbie on DO and I want to host some websites using ispconfig so I’m gonna try and create my first droplet tommorow.
The query I have is that I have successfully installed a while back on a raspberry pi ispconfig using the HowTo Perfect Setup and all worked fine.
Since I’m going to move to DO I’m a it confused about the DNS part because it seems you are not using bind like the HowTo doc does.
Why is that and what effect does it have when I add another domain to ispconfig, will I need to do dns records in DO instead and what records will I need to do to do to have a website with email?
Thank you Dimitri in advance.
Hey Zak,
in some Tutorials I am not installing BIND because it is not really necessary and in the worst case it is something that can be abused by bots. Since running a DNS is quite something critical I would not suggest running your own DNS unless you really know what you are doing. To run your own DNS you would need at least two servers and they should be setup in two different IP Subnets. So running just one bind instance is not really useful. To get your sites, mails and other services running you can, for example, use the Nameservers of Digital Ocean or any other DNS Provider. Usually you can also use the DNS where you’ve registered your Domains.