Teil 6 der ISPConfig Multi-Server Anleitung auf Ubuntu 16.04 mit Dediziertem Web-, Mail-, NS1-, NS2-, Datenbank-Server
- Einleitung & Vorbereitung der ISPConfig Multi Server
- ISPConfig Web Server installieren
- ISPConfig NS1 DNS Server installieren
- ISPConfig NS2 DNS Server installieren
- ISPConfig MariaDB Datenbank Server installieren
- ISPConfig Mail Server installieren
Auf dieser Seite beschreibe ich die Installation des Mail Servers. Folgende Inhalte werden hier beschrieben:
- Postfix, Dovecot, Sieve, SPF, Spam & AntiVirus
- Fail2Ban für Postfix & SASL
- ISPConfig auf dem Mail Server installieren
- Let‘s Encrypt auf dem Mail Server installieren
- Potfix Master.cf einstellen
- Postfix Main.cf einstellen
- ISPConfig abschließend einstellen
Zunächst trage ich die domain für den MailServer in mailname ein mit einem:
echo mx.ispconfig-server.space > /etc/mailname
Postfix, Dovecot, Sieve, SPF, Spam & AntiVirus
Dann installiere ich Postfix, Dovecot, Sieve und SPF für Postfix mit:
apt-get install postfix postfix-mysql postfix-doc openssl getmail4 rkhunter binutils dovecot-imapd dovecot-pop3d dovecot-mysql dovecot-sieve sudo postfix-policyd-spf-python
Während der Installation werden zwei Sachen abgefragt:
General type of configuration? <== Internet site
Mail name? <== mx.ispconfig-server.space
Damit eingehende E-Mails bei Eingang auf Viren geprüft werden, installiere ich einmal:
apt-get -y install amavisd-new spamassassin clamav clamav-daemon zoo unzip bzip2 arj nomarch lzop cabextract apt-listchanges libnet-ldap-perl libauthen-sasl-perl clamav-docs daemon libio-string-perl libio-socket-ssl-perl libnet-ident-perl zip libnet-dns-perl
Um etwas RAM zu sparen, werde ich spamassassin beenden und aus dem Autostart entfernen:
service spamassassin stop
update-rc.d -f spamassassin remove
Ich will, dass Emails die einen falschen SPF Eintrag haben vom Mail Server abgelehnt werden. Dazu stelle ich in der „policyd-spf.conf“ den Wert für „Mail_From_reject“ von „Fail“ auf „Softfail“. Postfix wird dann eingehende emails auf SPF Einträge prüfen und E-Mails ablehnen, die von einem falschen Mail Server kommen.
nano /etc/postfix-policyd-spf-python/policyd-spf.conf
Die Konfiguration sieht bei mir anschließend so aus:
# For a fully commented sample config file see policyd-spf.conf.commented

debugLevel = 1
defaultSeedOnly = 1

HELO_reject = SPF_Not_Pass
Mail_From_reject = Softfail

PermError_reject = False
TempError_Defer = False

skip_addresses = 127.0.0.0/8,::ffff:127.0.0.0/104,::1
Fail2Ban für Postfix & SASL
Jetzt stelle ich Fail2Ban auf dem Mail Server, bzw. für den Mail Server ein. Dazu mache ich erst ein Backup der jail.conf Datei mit:
mv /etc/fail2ban/jail.local /etc/fail2ban/jail.local-back
Dann öffne ich die Datei einmal neu
nano /etc/fail2ban/jail.local
und definiere folgendes:
[DEFAULT]
# "ignoreip" can be an IP address, a CIDR mask or a DNS host
ignoreip = 127.0.0.1/8 10.135.50.182 10.135.14.243 10.135.49.117 10.135.1.181 138.68.100.36 46.101.150.61 46.101.142.124 46.101.132.69 165.227.152.75
bantime  = 43200
maxretry = 5
action = %(action_mwl)s
findtime = 3600
[dovecot-pop3imap]
enabled = true
filter = dovecot-pop3imap
action = iptables-multiport[name=dovecot-pop3imap, port="pop3,pop3s,imap,imaps", protocol=tcp]
logpath = /var/log/mail.log

[postfix-sasl]
enabled  = true
port     = smtp,ssmtp
filter   = postfix-sasl
logpath  = /var/log/mail.log
Max Retry habe ich auf 5 eingestellt, um einige Passwort Eingaben mehr zu erlauben. Jetzt erstelle ich noch die notwendigen Filter. Für [dovecot-pop3imap]:
nano /etc/fail2ban/filter.d/dovecot-pop3imap.conf
und trage da folgendes ein:
[Definition]
failregex = (?: pop3-login|imap-login): .*(?:Authentication failure|Aborted login \(auth failed|Aborted login \(tried to use disabled|Disconnected \(auth failed|Aborted login \(\d+ authentication attempts).*rip=(?P<host>\S*),.*
ignoreregex =
Für [postfix-sasl]:
nano /etc/fail2ban/filter.d/dovecot-pop3imap.conf
Und mache da folgende Angaben. Es kann sein, dass es bei euch ggf. schon so aussieht.
# Fail2Ban filter for postfix authentication failures
#
[INCLUDES]
before = common.conf
[Definition]
_daemon = postfix/(submission/)?smtp(d|s)
failregex = ^%(__prefix_line)swarning: [-._\w]+\[<HOST>\]: SASL ((?i)LOGIN|PLAIN|(?:CRAM|DIGEST)-MD5) authentication failed(: [ A-Za-z0-9+/:]*={0,2})?\s*$
#failregex = .*warning.*hostname.*does not resolve to address <HOST>.*Name or service not known.*

ignoreregex = authentication failed: Connection lost to authentication server$
[Init]
journalmatch = _SYSTEMD_UNIT=postfix.service
# Author: Yaroslav Halchenko

ignoreregex =
ISPConfig auf dem Mail Server installieren
Auch hier, muss ich php installieren damit ISPConfig laufen kann.
apt-get install php7.0-cli php7.0-mysql php7.0-mcrypt mcrypt php7.0-mbstring
Und natürölich auch hier muss ISPConfig erst downloaden und anschließend entpacken mit:
cd /tmp
wget http://www.ispconfig.org/downloads/ISPConfig-3-stable.tar.gz
tar xfz ISPConfig-3-stable.tar.gz
cd ispconfig3_install/install/
Die Installation starte ich dann mit:
php -q install.php
Hier einmal wie es bei mir ausgesehen hatte und welche Angaben ich gemacht hatte:
root@mx:/tmp/ispconfig3_install/install# php -q install.php


--------------------------------------------------------------------------------
 _____ ___________   _____              __ _         ____
|_   _/  ___| ___ \ /  __ \            / _(_)       /__  \
  | | \ `--.| |_/ / | /  \/ ___  _ __ | |_ _  __ _    _/ /
  | |  `--. \  __/  | |    / _ \| '_ \|  _| |/ _` |  |_ |
 _| |_/\__/ / |     | \__/\ (_) | | | | | | | (_| | ___\ \
 \___/\____/\_|      \____/\___/|_| |_|_| |_|\__, | \____/
                                              __/ |
                                             |___/
--------------------------------------------------------------------------------


>> Initial configuration

Operating System: Ubuntu 16.04.3 LTS (Xenial Xerus)

    Following will be a few questions for primary configuration so be careful.
    Default values are in [brackets] and can be accepted with <ENTER>.
    Tap in "quit" (without the quotes) to stop the installer.


Select language (en,de) [en]:<== Enter
Installation mode (standard,expert) [standard]: <== expert
Full qualified hostname (FQDN) of the server, eg server1.domain.tld  [mx.ispconfig-server.space]: <== Enter
MySQL server hostname [localhost]: <== Enter
MySQL server port [3306]: <== Enter
MySQL root username [root]: <== Enter
MySQL root password []: <== 15XfullXROOTXplayX71
MySQL database to create [dbispconfig]: <== Enter
MySQL charset [utf8]: <== Enter
The next two questions are about the internal ISPConfig database user and password.
It is recommended to accept the defaults which are 'ispconfig' as username and a random password.
If you use a different password, use only numbers and chars for the password.
ISPConfig mysql database username [ispconfig]: <== Enter
ISPConfig mysql database password [56ea648997ea4d4b4e0f2616d2dedc5e]: <== Enter
Shall this server join an existing ISPConfig multiserver setup (y,n) [n]: <== y
MySQL master server hostname []: <== host.ispconfig-server.space
MySQL master server port []: <== 3306
MySQL master server root username [root]: <== Enter
MySQL master server root password []: <== 15XfullXROOTXplayX71
MySQL master server database name [dbispconfig]: <== Enter
[WARN] autodetect for Apache failed
Force configure Apache (y,n) [n]: <== Enter
Skipping Apache
[WARN] autodetect for nginx failed
Force configure nginx (y,n) [n]: <== Enter
Skipping nginx
Adding ISPConfig server record to database.
Configure Mail (y,n) [y]: <== Enter
Configuring Postgrey
Configuring Postfix
Generating a 4096 bit RSA private key
............................................................................................++
....................................................................................................................................................................................................................................++
writing new private key to 'smtpd.key'
-----
You are about to be asked to enter information that will be incorporated
into your certificate request.
What you are about to enter is what is called a Distinguished Name or a DN.
There are quite a few fields but you can leave some blank
For some fields there will be a default value,
If you enter '.', the field will be left blank.
-----
Country Name (2 letter code) [AU]: <== Enter
State or Province Name (full name) [Some-State]: <== Enter
Locality Name (eg, city) []: <== Enter
Organization Name (eg, company) [Internet Widgits Pty Ltd]: <== Enter
Organizational Unit Name (eg, section) []: <== Enter
Common Name (e.g. server FQDN or YOUR name) []: <== Enter
Email Address []: <== Enter
[WARN] autodetect for Mailman failed
Force configure Mailman (y,n) [n]: <== Enter
Skipping Mailman
Configuring Dovecot
Configuring Spamassassin
Configuring Amavisd
Configuring Getmail
[WARN] autodetect for Jailkit failed
Force configure Jailkit (y,n) [n]: <== Enter
Skipping Jailkit
[WARN] autodetect for pureftpd failed
Force configure pureftpd (y,n) [n]: <== Enter
Skipping pureftpd
Configure DNS Server (y,n) [y]: <== n
The Web Server option has to be enabled when you want run a web server or when this node shall host the ISPConfig interface.
Configure Web Server (y,n) [y]: <== n
[WARN] autodetect for OpenVZ failed
Force configure OpenVZ (y,n) [n]: <== Enter
Skipping OpenVZ
Configure Firewall Server (y,n) [y]: <== Enter
Configuring Ubuntu Firewall
[WARN] autodetect for Metronome XMPP Server failed
Force configure Metronome XMPP Server (y,n) [n]: <== Enter
Skipping Metronome XMPP Server
Configuring Fail2ban
Install ISPConfig Web Interface (y,n) [n]: <== Enter
_
Configuring DBServer
Installing ISPConfig crontab
Installing ISPConfig crontab
no crontab for root
no crontab for getmail
Detect IP addresses
Restarting services …
Installation completed.
Let‘s Encrypt auf dem Mail Server installieren
Damit Postfix & Dovecot ein korrektes Zertifikat beim Mail Versand ausliefert, installiere ich Let‘s Encrypt mit einem:
apt install letsencrypt
Dann erstelle ich ein Zertifikat für die domain mx.ispconfig-server.space mit einem:
letsencrypt certonly
Enter email address (used for urgent notices and lost key recovery: <== postmaster@ispconfig-server.space
Please enter in your domain name(s) (Comma and/or space separated) <==  mx.ispconfig-server.space
Anschließend wird mir ein:
Important Notes:
- Congratulations! Your certificate and chain have been saved at
  /etc/letsencrypt/live/mx.ispconfig-server.space/fullchain.pem….
[…]
Angezeigt. Was bedeuted, das Zertifikat wurde ausgestellt. Damit das Zertifikat automatisch verlängert wird, werde ich einen Cronjob nutzen der zweimal am Tag läuft.
crontab -e
und trage da am ende der Datei folgendes ein:
17 */12 * * * letsencrypt renew --no-self-upgrade >/dev/null && service postfix restart && service dovecot restart
Jetzt erstelle ich ein Backup der aktuellen Postfix & Dovecot Zertifikate mit:
mv /etc/postfix/smtpd.cert /etc/postfix/smtpd.cert-bak
mv /etc/postfix/smtpd.key /etc/postfix/smtpd.key-bak
Und dann setze ich einen symbolischen Link von den CA signierten Let‘s Encrypt zertifikaten auf /etc/postfix/privkey.pem und /etc/postfix/smtpd.key mit:
ln -s /etc/letsencrypt/live/mx.ispconfig-server.space/privkey.pem /etc/postfix/smtpd.key
ln -s /etc/letsencrypt/live/mx.ispconfig-server.space/fullchain.pem /etc/postfix/smtpd.cert
Potfix Master.cf einstellen
Jetzt will ich noch die master.cf Datei in Postfix anpassen. Dazu mache ich von der Datei erst ein Backup mit:
mv /etc/postfix/master.cf /etc/postfix/master.cf-back
Die Datei erstelle ich dann einmal neu mit:
nano /etc/postfix/master.cf
und da trage ich dann folgendes ein:
#
# Postfix master process configuration file.  For details on the format
# of the file, see the master(5) manual page (command: "man 5 master" or
# on-line: http://www.postfix.org/master.5.html).
#
# Do not forget to execute "postfix reload" after editing this file.
#
# ==========================================================================
# service type  private unpriv  chroot  wakeup  maxproc command + args
#               (yes)   (yes)   (no)    (never) (100)
# ==========================================================================
smtp      inet  n       -       y       -       -       smtpd
#smtp      inet  n       -       y       -       1       postscreen
#smtpd     pass  -       -       y       -       -       smtpd
#dnsblog   unix  -       -       y       -       0       dnsblog
#tlsproxy  unix  -       -       y       -       0       tlsproxy
submission inet n       -       y       -       -       smtpd
  -o syslog_name=postfix/submission
  -o smtpd_tls_security_level=encrypt
  -o smtpd_sasl_auth_enable=yes
  -o smtpd_client_restrictions=permit_sasl_authenticated,reject
#  -o smtpd_reject_unlisted_recipient=no
#  -o smtpd_client_restrictions=$mua_client_restrictions
#  -o smtpd_helo_restrictions=$mua_helo_restrictions
#  -o smtpd_sender_restrictions=$mua_sender_restrictions
#  -o smtpd_recipient_restrictions=
#  -o smtpd_relay_restrictions=permit_sasl_authenticated,reject
#  -o milter_macro_daemon_name=ORIGINATING
smtps     inet  n       -       y       -       -       smtpd
  -o syslog_name=postfix/smtps
  -o smtpd_tls_wrappermode=yes
  -o smtpd_sasl_auth_enable=yes
  -o smtpd_client_restrictions=permit_sasl_authenticated,reject
#  -o smtpd_reject_unlisted_recipient=no
#  -o smtpd_client_restrictions=$mua_client_restrictions
#  -o smtpd_helo_restrictions=$mua_helo_restrictions
#  -o smtpd_sender_restrictions=$mua_sender_restrictions
#  -o smtpd_recipient_restrictions=
#  -o smtpd_relay_restrictions=permit_sasl_authenticated,reject
#  -o milter_macro_daemon_name=ORIGINATING
#628       inet  n       -       y       -       -       qmqpd
pickup    unix  n       -       y       60      1       pickup
cleanup   unix  n       -       y       -       0       cleanup
qmgr      unix  n       -       n       300     1       qmgr
#qmgr     unix  n       -       n       300     1       oqmgr
tlsmgr    unix  -       -       y       1000?   1       tlsmgr
rewrite   unix  -       -       y       -       -       trivial-rewrite
bounce    unix  -       -       y       -       0       bounce
defer     unix  -       -       y       -       0       bounce
trace     unix  -       -       y       -       0       bounce
verify    unix  -       -       y       -       1       verify
flush     unix  n       -       y       1000?   0       flush
proxymap  unix  -       -       n       -       -       proxymap
proxywrite unix -       -       n       -       1       proxymap
smtp      unix  -       -       y       -       -       smtp
relay     unix  -       -       y       -       -       smtp
#       -o smtp_helo_timeout=5 -o smtp_connect_timeout=5
showq     unix  n       -       y       -       -       showq
error     unix  -       -       y       -       -       error
retry     unix  -       -       y       -       -       error
discard   unix  -       -       y       -       -       discard
local     unix  -       n       n       -       -       local
virtual   unix  -       n       n       -       -       virtual
lmtp      unix  -       -       y       -       -       lmtp
anvil     unix  -       -       y       -       1       anvil
scache    unix  -       -       y       -       1       scache
#
# ====================================================================
# Interfaces to non-Postfix software. Be sure to examine the manual
# pages of the non-Postfix software to find out what options it wants.
#
# Many of the following services use the Postfix pipe(8) delivery
# agent.  See the pipe(8) man page for information about ${recipient}
# and other message envelope options.
# ====================================================================
#
# maildrop. See the Postfix MAILDROP_README file for details.
# Also specify in main.cf: maildrop_destination_recipient_limit=1
#
maildrop  unix  -       n       n       -       -       pipe
  flags=DRhu user=vmail argv=/usr/bin/maildrop -d vmail ${extension} ${recipient} ${user} ${nexthop} ${sender}
#
# ====================================================================
#
# Recent Cyrus versions can use the existing "lmtp" master.cf entry.
#
# Specify in cyrus.conf:
#   lmtp    cmd="lmtpd -a" listen="localhost:lmtp" proto=tcp4
#
# Specify in main.cf one or more of the following:
#  mailbox_transport = lmtp:inet:localhost
#  virtual_transport = lmtp:inet:localhost
#
# ====================================================================
#
# Cyrus 2.1.5 (Amos Gouaux)
# Also specify in main.cf: cyrus_destination_recipient_limit=1
#
#cyrus     unix  -       n       n       -       -       pipe
#  user=cyrus argv=/cyrus/bin/deliver -e -r ${sender} -m ${extension} ${user}
#
# ====================================================================
# Old example of delivery via Cyrus.
#
#old-cyrus unix  -       n       n       -       -       pipe
#  flags=R user=cyrus argv=/cyrus/bin/deliver -e -m ${extension} ${user}
#
# ====================================================================
#
# See the Postfix UUCP_README file for configuration details.
#
uucp      unix  -       n       n       -       -       pipe
  flags=Fqhu user=uucp argv=uux -r -n -z -a$sender - $nexthop!rmail ($recipient)
#
# Other external delivery methods.
#
ifmail    unix  -       n       n       -       -       pipe
  flags=F user=ftn argv=/usr/lib/ifmail/ifmail -r $nexthop ($recipient)
bsmtp     unix  -       n       n       -       -       pipe
  flags=Fq. user=bsmtp argv=/usr/lib/bsmtp/bsmtp -t$nexthop -f$sender $recipient
scalemail-backend unix	-	n	n	-	2	pipe
  flags=R user=scalemail argv=/usr/lib/scalemail/bin/scalemail-store ${nexthop} ${user} ${extension}
mailman   unix  -       n       n       -       -       pipe
  flags=FR user=list argv=/usr/lib/mailman/bin/postfix-to-mailman.py
  ${nexthop} ${user}

dovecot   unix  -       n       n       -       -       pipe
  flags=DRhu user=vmail:vmail argv=/usr/lib/dovecot/deliver -f ${sender} -d ${user}@${nexthop}

amavis unix - - - - 2 smtp
        -o smtp_data_done_timeout=1200
        -o smtp_send_xforward_command=yes


127.0.0.1:10025 inet n - n - - smtpd
        -o content_filter=
        -o local_recipient_maps=
        -o relay_recipient_maps=
        -o smtpd_restriction_classes=
        -o smtpd_client_restrictions=
        -o smtpd_helo_restrictions=
        -o smtpd_sender_restrictions=
        -o smtpd_recipient_restrictions=permit_mynetworks,reject
        -o mynetworks=127.0.0.0/8
        -o strict_rfc821_envelopes=yes
        -o receive_override_options=no_unknown_recipient_checks,no_header_body_checks
        -o smtp_send_xforward_command=yes
        -o disable_dns_lookups=no


127.0.0.1:10027 inet n - n - - smtpd
        -o content_filter=
        -o local_recipient_maps=
        -o relay_recipient_maps=
        -o smtpd_restriction_classes=
        -o smtpd_client_restrictions=
        -o smtpd_helo_restrictions=
        -o smtpd_sender_restrictions=
        -o smtpd_recipient_restrictions=permit_mynetworks,reject
        -o mynetworks=127.0.0.0/8
        -o strict_rfc821_envelopes=yes
        -o receive_override_options=no_unknown_recipient_checks,no_header_body_checks
        -o smtp_send_xforward_command=yes
      	-o milter_default_action=accept
        -o milter_macro_daemon_name=ORIGINATING
        -o disable_dns_lookups=no

policy-spf  unix  -       n       n       -       -       spawn
     user=nobody argv=/usr/bin/policyd-spf
Postfix Main.cf einstellen
Und um die main.cf Datei zu bearbeiten, erstelle ich auch erst ein Backup von Original mit:
mv /etc/postfix/main.cf /etc/postfix/main.cf-back
Die Datei erstelle ich neu mit:
nano /etc/postfix/main.cf
Und füge da folgenden Inhalt ein: ACHTUNG – Hier bitte auf jeden Fall myhostname und mydestination anpassen.
# See /usr/share/postfix/main.cf.dist for a commented, more complete version
# Debian specific:  Specifying a file name will cause the first
# line of that file to be used as the name.  The Debian default
# is /etc/mailname.
#myorigin = /etc/mailname

smtpd_banner = $myhostname $mail_name
biff = no

# appending .domain is the MUA's job.
append_dot_mydomain = no

# Uncomment the next line to generate "delayed mail" warnings
#delay_warning_time = 4h

readme_directory = /usr/share/doc/postfix

# TLS parameters
smtpd_tls_cert_file = /etc/postfix/smtpd.cert
smtpd_tls_key_file = /etc/postfix/smtpd.key
smtpd_use_tls = yes
smtpd_tls_session_cache_database = btree:${data_directory}/smtpd_scache
smtp_tls_session_cache_database = btree:${data_directory}/smtp_scache

# See /usr/share/doc/postfix/TLS_README.gz in the postfix-doc package for
# information on enabling SSL in the smtp client.

smtpd_relay_restrictions = permit_mynetworks permit_sasl_authenticated defer_unauth_destination
alias_maps = hash:/etc/aliases, hash:/var/lib/mailman/data/aliases
alias_database = hash:/etc/aliases, hash:/var/lib/mailman/data/aliases

myhostname = mx.ispconfig-server.space
myorigin = /etc/mailname
mydestination = mx.ispconfig-server.space, localhost, localhost.localdomain
mynetworks = 127.0.0.0/8 [::1]/128
inet_interfaces = all
inet_protocols = all
html_directory = /usr/share/doc/postfix/html

relayhost =
mailbox_size_limit = 0
recipient_delimiter = +

virtual_alias_domains =
virtual_alias_maps =
  hash:/var/lib/mailman/data/virtual-mailman,
  proxy:mysql:/etc/postfix/mysql-virtual_forwardings.cf,
  proxy:mysql:/etc/postfix/mysql-virtual_email2email.cf

virtual_mailbox_domains = proxy:mysql:/etc/postfix/mysql-virtual_domains.cf
virtual_mailbox_maps = proxy:mysql:/etc/postfix/mysql-virtual_mailboxes.cf
virtual_mailbox_base = /var/vmail
virtual_uid_maps = mysql:/etc/postfix/mysql-virtual_uids.cf
virtual_gid_maps = mysql:/etc/postfix/mysql-virtual_gids.cf

sender_bcc_maps = proxy:mysql:/etc/postfix/mysql-virtual_outgoing_bcc.cf
smtpd_sasl_auth_enable = yes
broken_sasl_auth_clients = yes
smtpd_sasl_authenticated_header = yes
smtpd_restriction_classes = greylisting
greylisting = check_policy_service inet:127.0.0.1:10023

smtpd_tls_security_level = may
transport_maps = hash:/var/lib/mailman/data/transport-mailman, proxy:mysql:/etc/postfix/mysql-virtual_transports.cf
relay_domains = mysql:/etc/postfix/mysql-virtual_relaydomains.cf
relay_recipient_maps = mysql:/etc/postfix/mysql-virtual_relayrecipientmaps.cf
smtpd_sender_login_maps = proxy:mysql:/etc/postfix/mysql-virtual_sender_login_maps.cf
proxy_read_maps = $local_recipient_maps $mydestination $virtual_alias_maps $virtual_alias_domains $sender_bcc_maps $virtual_mailbox_maps $virtual_mailbox_domains $relay_recipient_maps $relay_domains $canonical_maps $sender_canonical_maps $recipient_canonical_maps $relocated_maps $transport_maps $mynetworks $smtpd_sender_login_maps

smtpd_helo_required = yes
strict_rfc821_envelopes = yes
smtpd_client_message_rate_limit = 100

smtpd_helo_restrictions =
  permit_mynetworks,
  permit_sasl_authenticated,
  reject_invalid_helo_hostname,
  reject_non_fqdn_helo_hostname,
  reject_unknown_helo_hostname,
  check_helo_access regexp:/etc/postfix/helo_access,
  check_helo_access regexp:/etc/postfix/blacklist_helo

smtpd_sender_restrictions =
  permit_mynetworks,
  permit_sasl_authenticated,
  check_sender_access mysql:/etc/postfix/mysql-virtual_sender.cf,
  check_sender_access regexp:/etc/postfix/tag_as_foreign.re,
  check_sender_access regexp:/etc/postfix/tag_as_originating.re,
  reject_unlisted_sender,
  reject_non_fqdn_sender,
  reject_unknown_sender_domain,
  reject_sender_login_mismatch,
  reject_unauth_pipelining,
  reject_non_fqdn_sender

smtpd_client_restrictions =
  permit_mynetworks,
  permit_sasl_authenticated,
  check_client_access mysql:/etc/postfix/mysql-virtual_client.cf

smtpd_recipient_restrictions =
  permit_sasl_authenticated,
  permit_mynetworks,
  reject_unauth_destination,
  reject_invalid_hostname,
  reject_non_fqdn_hostname,
  reject_non_fqdn_sender,
  reject_non_fqdn_recipient,
  reject_unknown_sender_domain,
  reject_unknown_client_hostname,
  reject_unauth_pipelining,
  reject_unknown_recipient_domain,
  check_policy_service unix:private/policy-spf,
  check_recipient_access mysql:/etc/postfix/mysql-virtual_recipient.cf,
  reject_rbl_client zen.spamhaus.org,
  check_recipient_access mysql:/etc/postfix/mysql-virtual_policy_greylist.cf

smtpd_data_restrictions = reject_unauth_pipelining
smtpd_delay_reject = yes
maildrop_destination_concurrency_limit = 1
maildrop_destination_recipient_limit = 1
virtual_transport = dovecot
header_checks = regexp:/etc/postfix/header_checks
mime_header_checks = regexp:/etc/postfix/mime_header_checks
nested_header_checks = regexp:/etc/postfix/nested_header_checks
body_checks = regexp:/etc/postfix/body_checks
owner_request_special = no
smtp_tls_security_level = may
smtpd_tls_mandatory_protocols = !SSLv2, !SSLv3
smtpd_tls_protocols = !SSLv2,!SSLv3
smtp_tls_protocols = !SSLv2,!SSLv3
smtpd_tls_exclude_ciphers = RC4, aNULL
smtp_tls_exclude_ciphers = RC4, aNULL
dovecot_destination_recipient_limit = 1
smtpd_sasl_type = dovecot
smtpd_sasl_path = private/auth
content_filter = amavis:[127.0.0.1]:10024
receive_override_options = no_address_mappings
message_size_limit = 0
policy-spf_time_limit = 3600s
compatibility_level = 2
Jetzt müssen Postfix und Dovecot neu gestartet werden mit:
service postfix reload
service dovecot reload
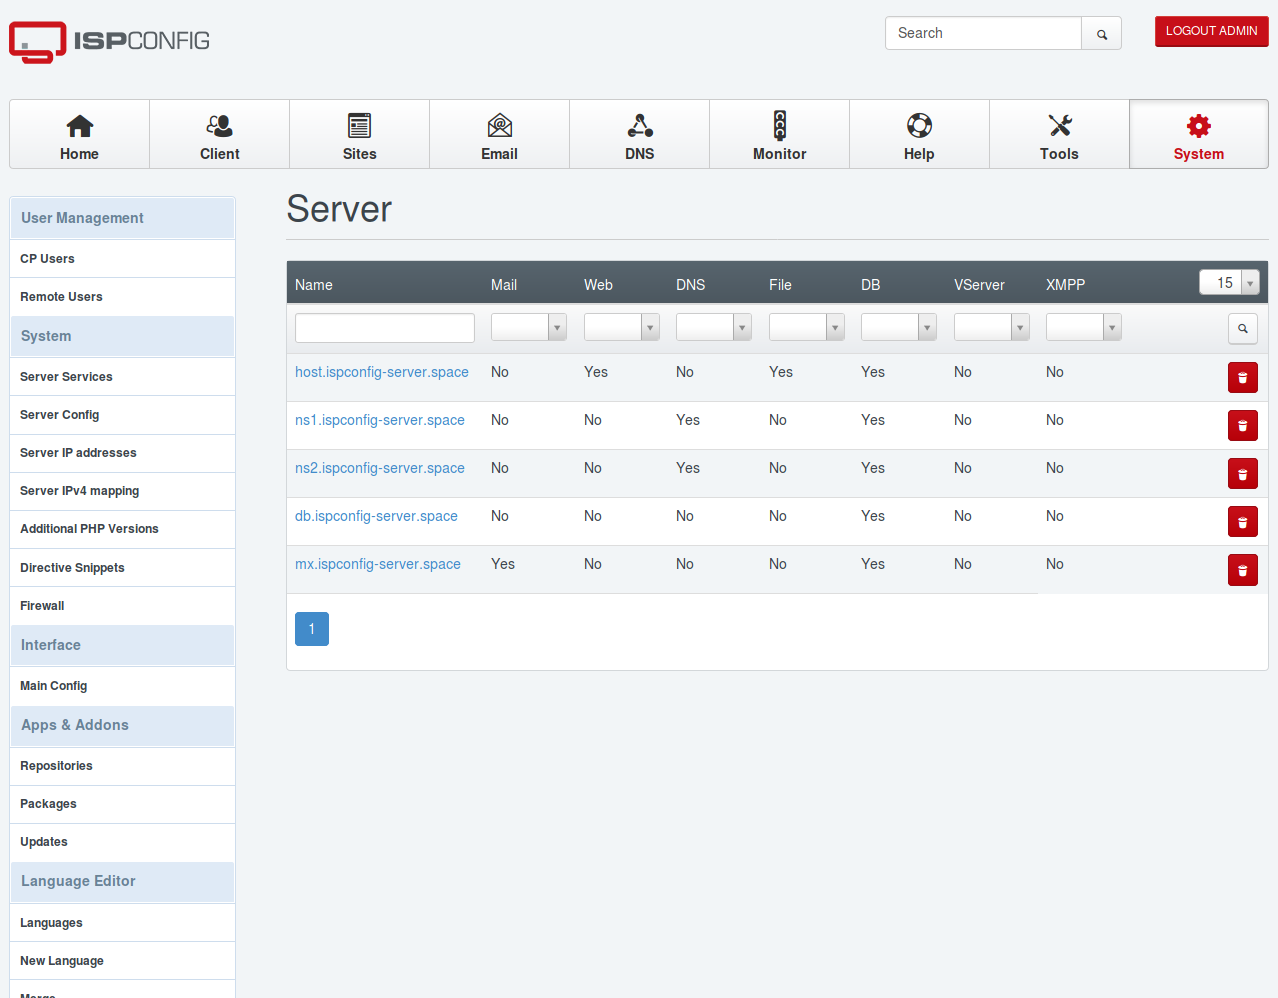
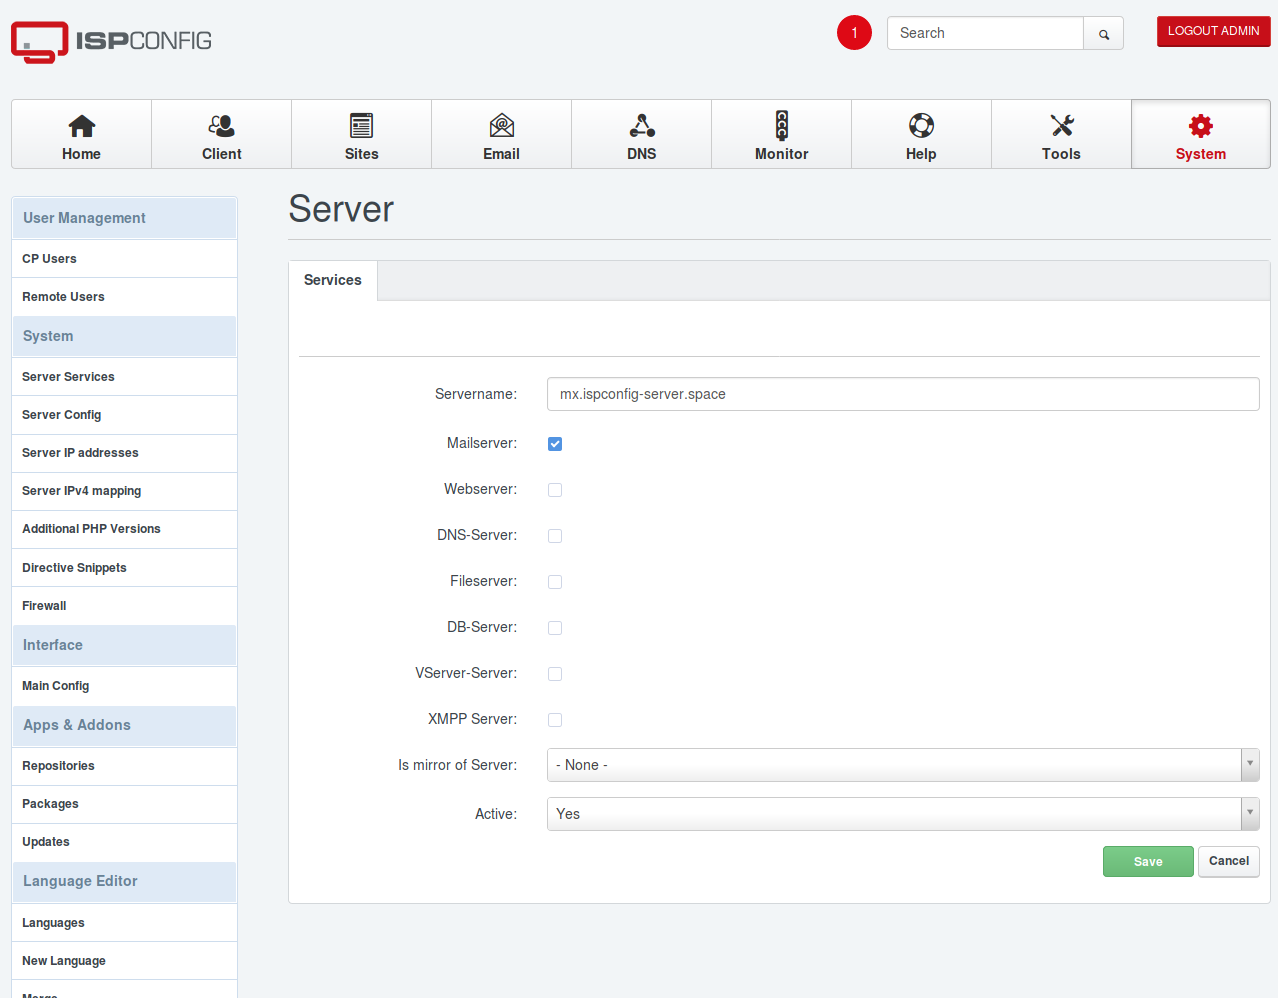
Und das war es schon fast. Jetzt müssen noch einige Kleinigkeiten in ISPConfig einstellt werden. Zunächst müssen unter „Server Services“ noch die jeweiligen Dienste angepasst werden.
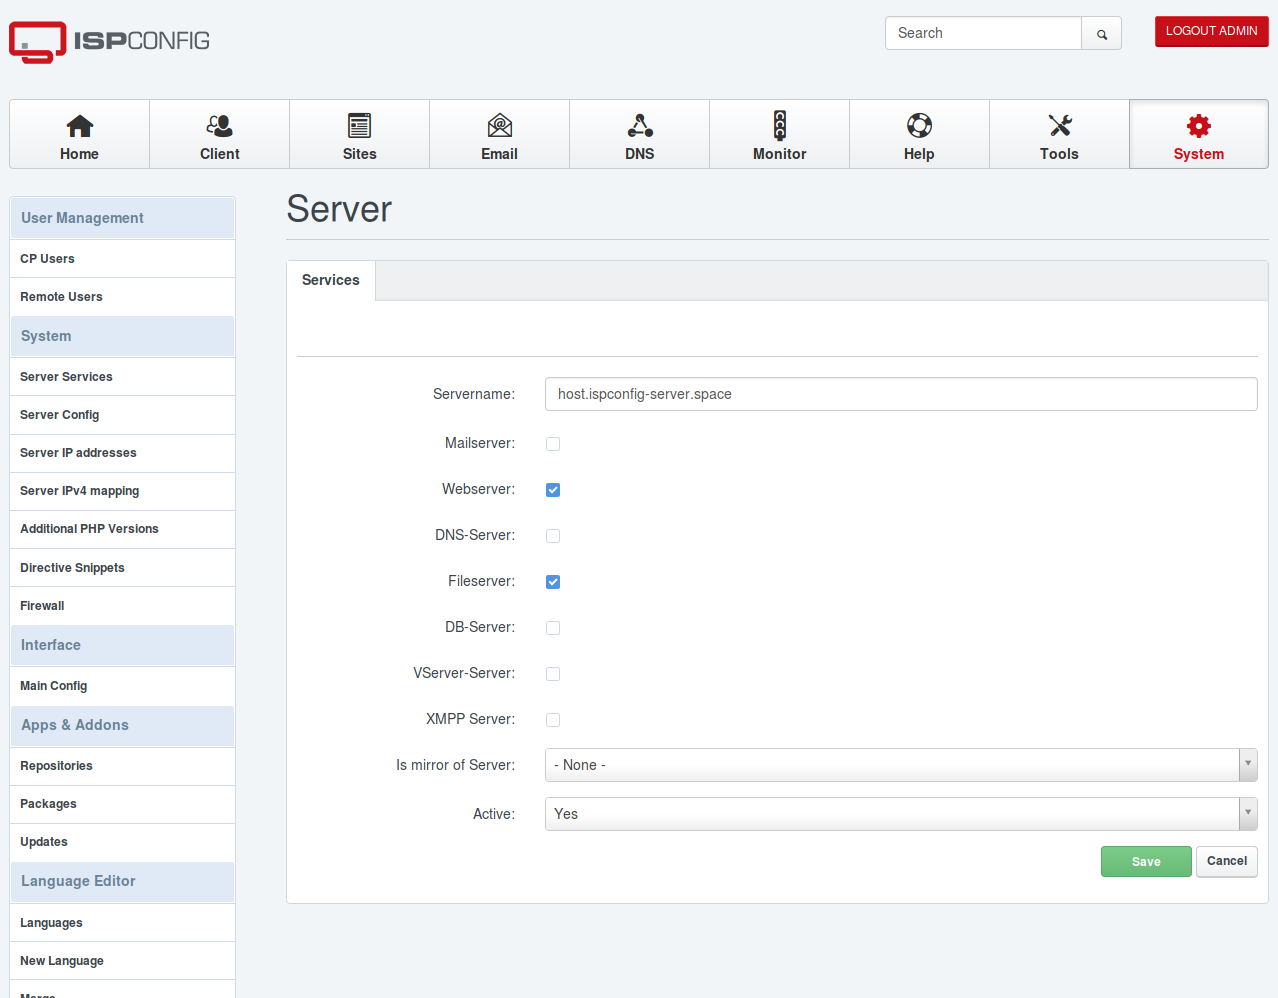
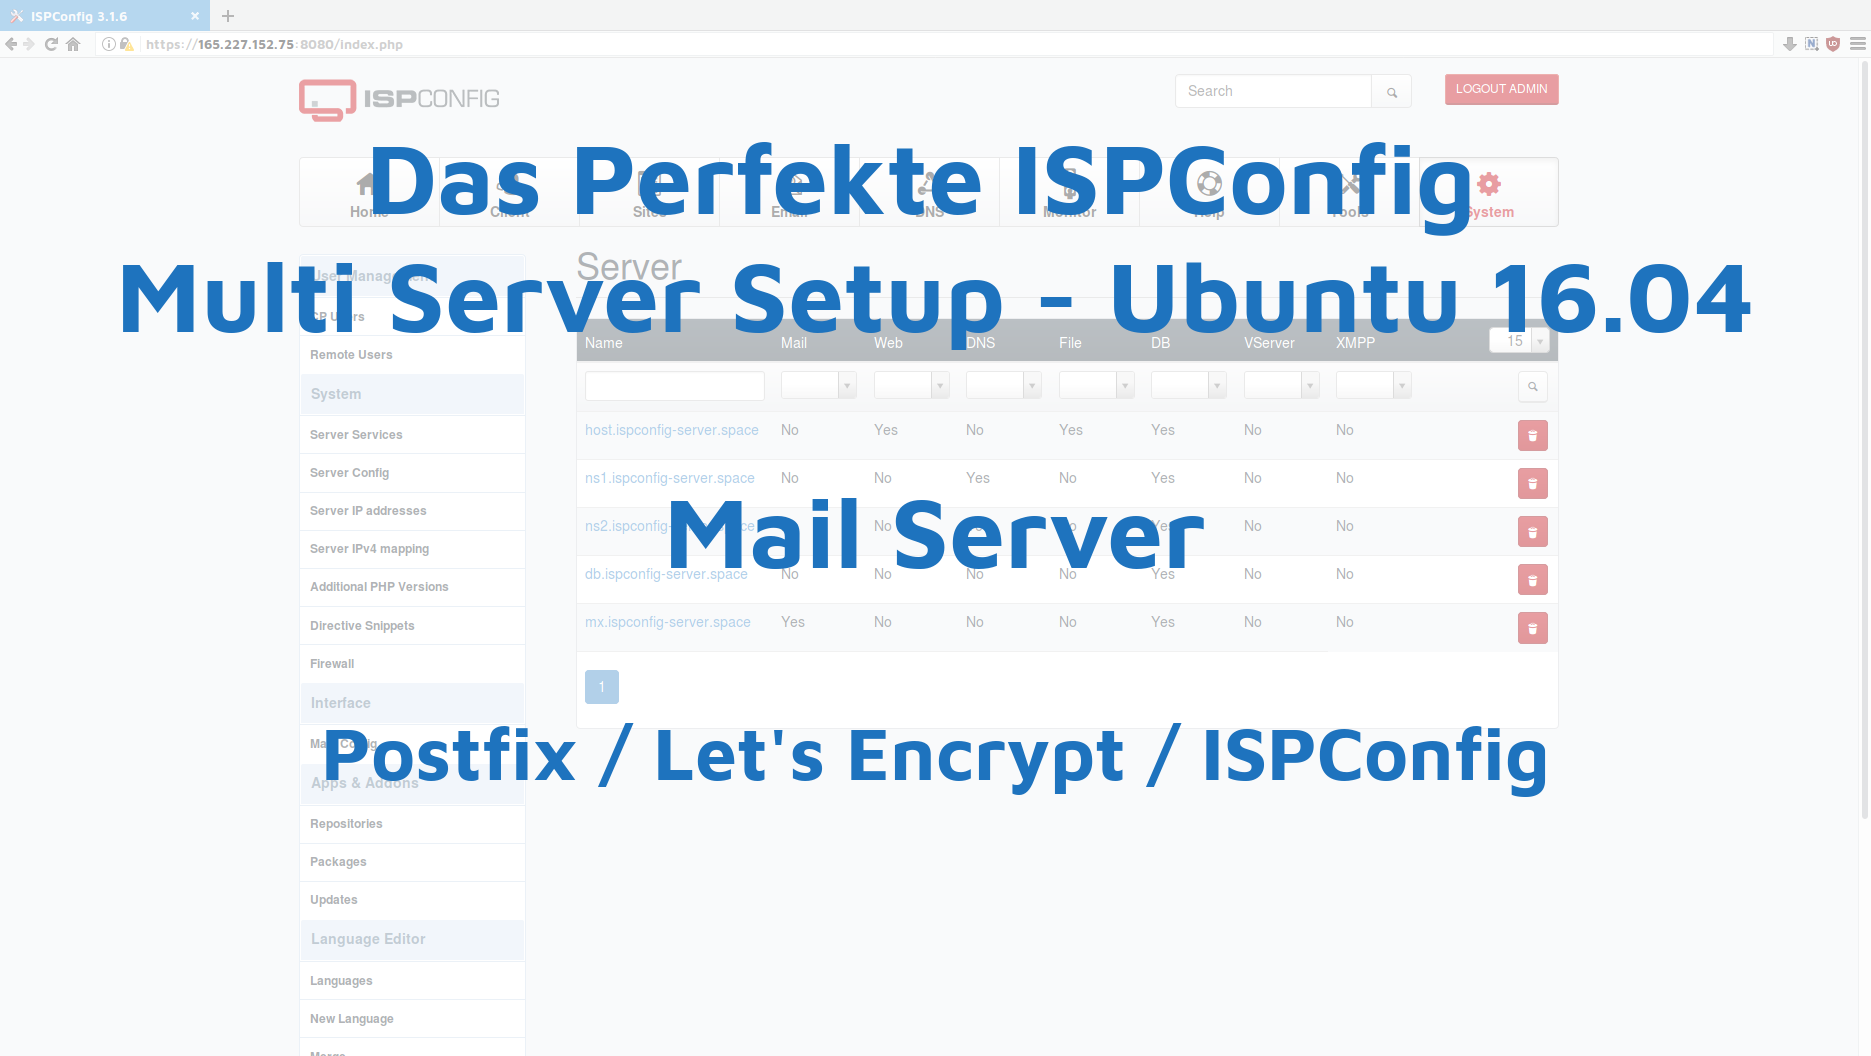
host.ispconfig-server.space ist nur der Web & File Server. Also deaktiviere ich da alles andere und klicke auf Save zum Speichern.
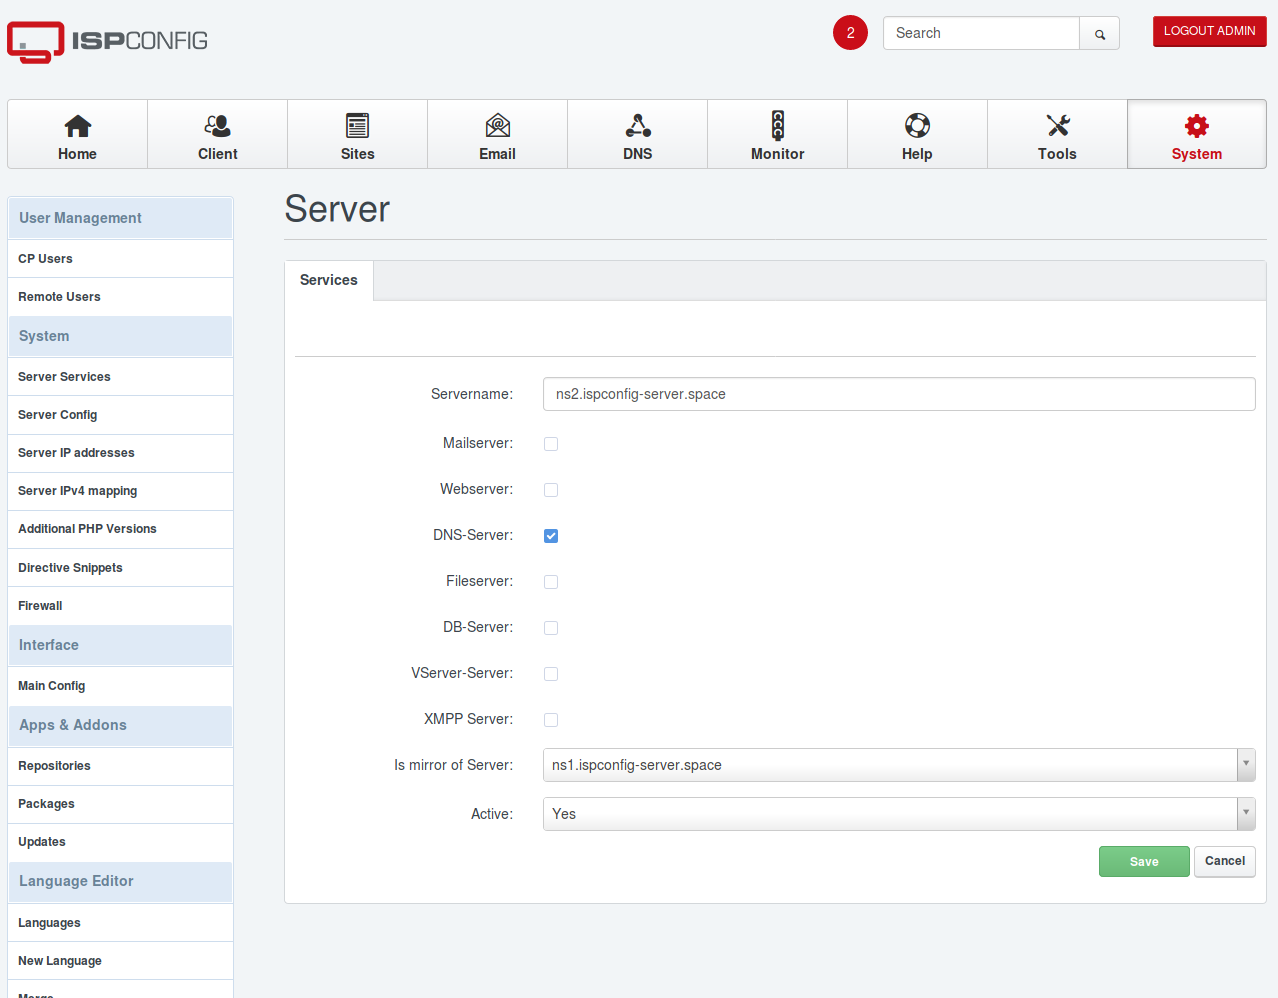
ns1.ispconfig-server.space ist nur der NS1. Also deaktiviere ich hier ebenfalls alles bis auf DNS-Server und speichere das.Bei ns2.ispconfig-server.space aktiviere ich ebenfalls nur DNS-Server und wähle unten bei „Is mirror of Server:“ , „ns1.ispconfig-server.space“ aus. Damit werden sämtliche Änderungen in NS1, direkt und 1zu1 an NS2 geschickt.
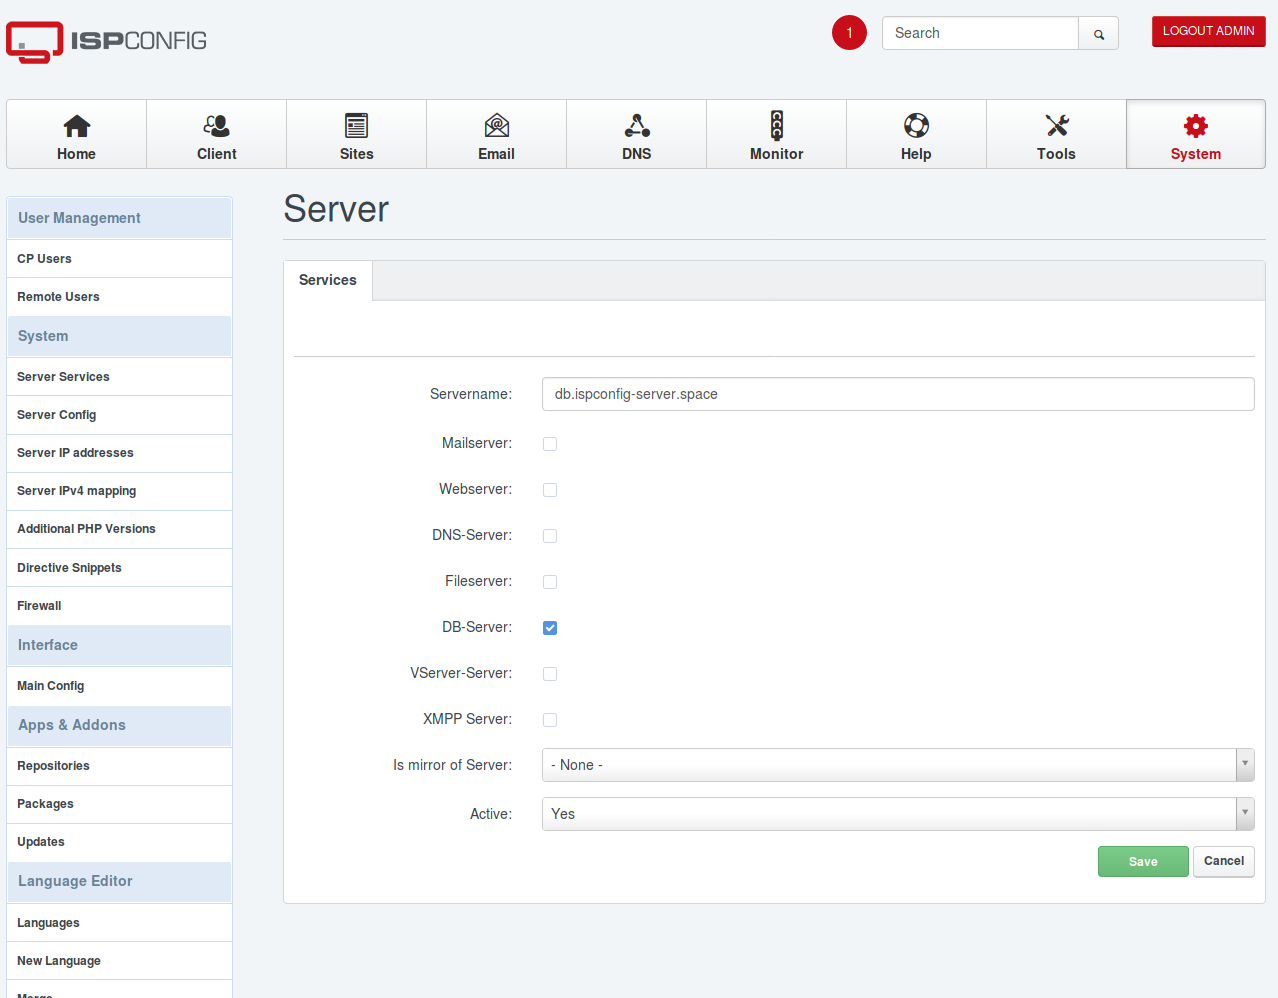
db.ispconfig-server.space ist mein Datenbank Server. Also aktiviere ich hier nur DB-Server und speichere das alles.
mx.ispconfig-server.space ist der Mail Server. Also aktiviere ich hier nur „Mailserver“.
Im Nächsten Schritt will ich die IP Adressen anpassen. Dazu in ISPConfig auf System => Server IP addresses klicken. Da werden zu viele IP Adressen angezeigt. Also entferne ich alle IP Adressen, bis auf die Externen.
Und als letzten Schritt, damit ISPConfig die korrekte IP in den Remote Hosts, beim erstellen der Datenbanken einträgt, Stelle ich die Server IP unter System => Service Config => Server Tab, von 127.0.1.1 auf die interne IP von host.ispconfig-server.space (10.135.53.63) um.